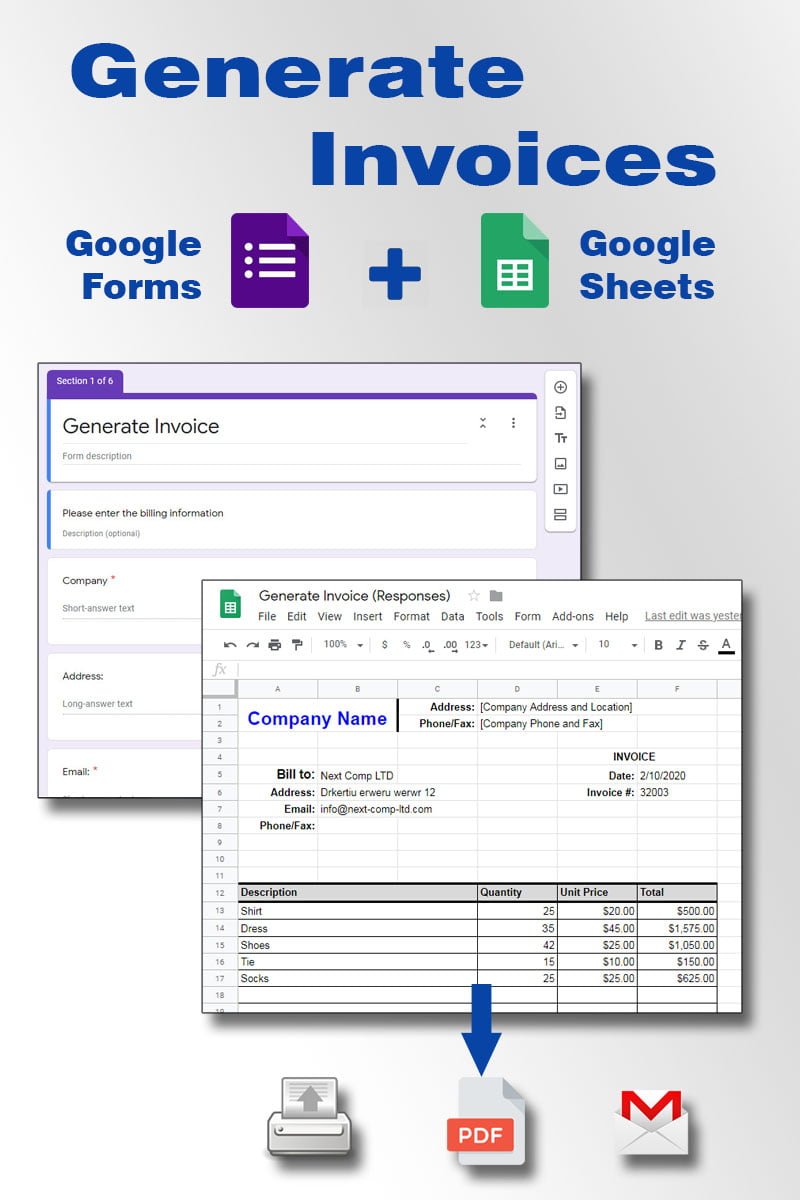
In this guide, we are going to build a small web app to generate invoices using Google Form and Sheets. Basically, we are going to create a Google Form that collects the data for the invoice and sends it to a spreadsheet. In the spreadsheet, we are going to create an invoice template for printing and we are going to use formulas to get the latest data automatically.
So, just by filling in the Form, without any additional work, the Google template invoice is going to be populated with the latest data and it can be printed immediately. In addition to this, we will insert a script that will automatically, on form submission, save the invoice as PDF in your Drive and/or send it as an attachment in an email.
I know it sounds difficult, I know you have your template in some document or maybe in a spreadsheet with formulas to do the calculation for you. But this setup is going to be very easy to implement, you will have your data in one place, you will automate the whole procedure and you can track payments much easier.
Create a Google Form to collect Invoice data
If you are a beginner you can learn more about Google Forms from this article: How to Create Google Form and How to Google Form Responses.
The problem in creating this type of form is that the more products or services you sell the more complex the input field is going to get. Also, you have to define upfront, the maximum number of items you going to include in your invoice. If these limits are not making you problems then this is the perfect solution for you.
For this example, I have created a Google Form that includes 6 products and 5 fields to populate the invoice template. This means that I can populate only 5 fields in the invoice with any of the 6 products.
The template for the invoice, in the Google Sheet, has space for 20 fields, so you can create up to 20 fields to be populated with product details. For the products/services input, you can use a “Short answer” question and get the name, so basically there is no limit to the number of products/services you can create invoice with.
In my example, I use a “Multiple choice” question type to get the product. This way is better if you have a limited number of products/services and you want to minimize human error when entering the name. Also, you can use further analyses on the sales and not worry that some products are not going to be included if you made a small typo.
Here is the link to the Form: Generate Invoice Form, and here is a link that will create a copy of the Form in your Drive: Generate Invoice Form COPY so you can adapt it to your needs.
As you can see, the first section of the Form is for gathering general data for the recipient of the invoice. The two most important fields here are “Company Name” and “Company email”, so they are marked as Required. We need the “Company email” field as required so we can use a script to send the email to that address. Here is a screenshot:
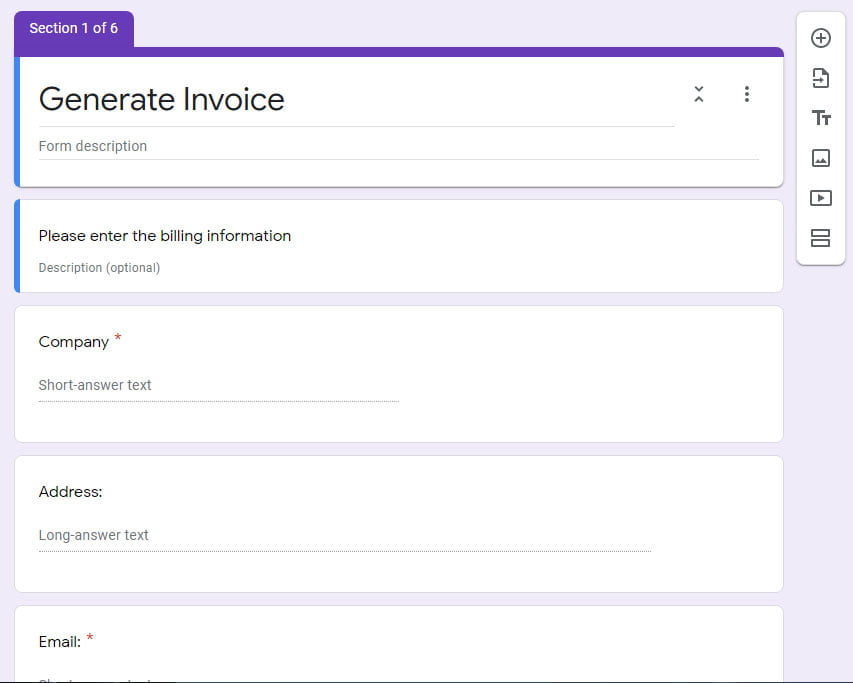
You can add or remove questions in your Form to whatever fits you, I have just included the basic ones.
Next, we need to collect the products/services that we are going to include in the invoice. For this, we need to get the product/service, price, and quantity. The best way to do this is to create a “Section” and add all the input fields there. If you create a section, you can go ahead and duplicate that section to create more inputs for the invoice. Also, when you are filing up the form, if you don’t need to populate all sections, you can include a “Multiple choice” question with “Go to section based on answer” and skip the rest.
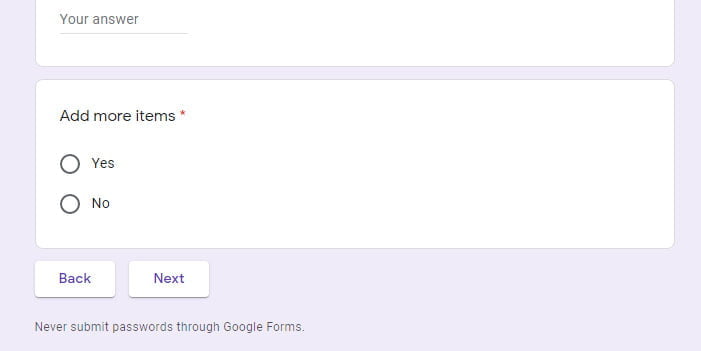
For example, you have 20 sections in your form, for the option to add 20 items in your invoice, but you need to add only 3. Instead of clicking “Next” through the rest of the 17 sections, you can ask in your “Multiple choice” question, do you want to add another item, and based on response to direct his action. You can do this with the “Go to section based on answer” option and select either “Go to next section” or “Submit form”. Here is how it looks in the form entry part:
Now, to continue, create a new section whit the name “Invoice Item 1” to add the input fields there. To get the product name I use a “Multiple choice” question, but you can use “Short text” question type if you have a large number of products. Next, add a “Short text” question to get the quantity, but use response validation to validate that the entered value is a number. Here is how:
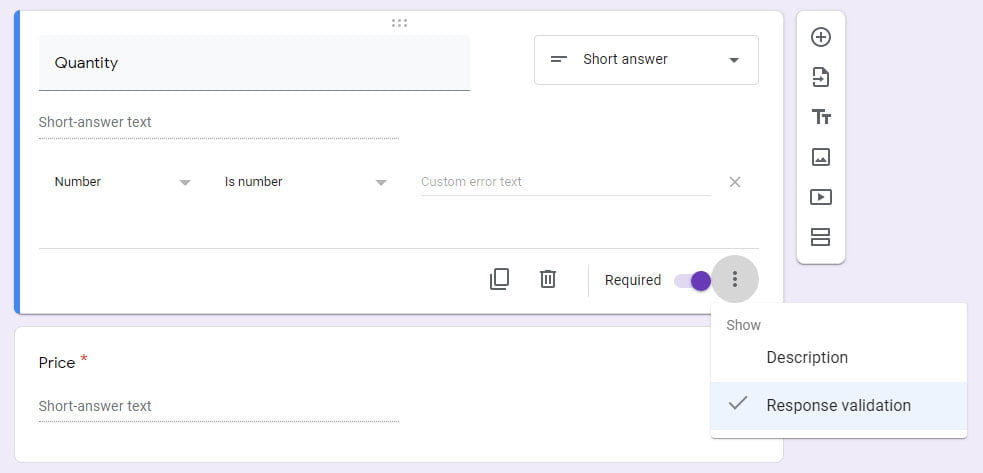
And the last input you need, to complete the product information, is the “Price” for the product. So, add another “Short text” question and validate the response as a number, just like for the quantity question.
As I explained earlier, we are going to add one more question in order to determine if we need to add more items or not. So, add a “Multiple choice” question with the title “Add more items?” and add “Yes” and “No” as options. Now, select “Go to section based on answer” option from the three-dot menu and select “Continue to next section” for the “Yes” and “Submit form” for the “No” option.
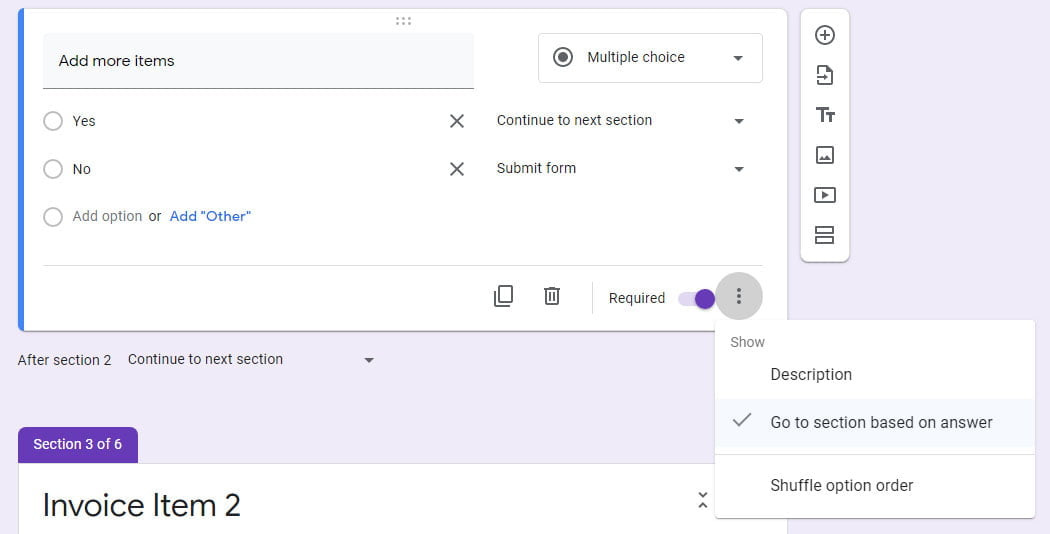
Now, we have a section “Invoice Item 1” with all the necessary fields to populate one row in the invoice template. In order to populate more fields in the invoice, we need to create more sections like this. Now, instead of creating more sections with the same input fields, you can just use the “Duplicate Section” option. You can find this option in the three-dot menu in the section field. Create as many sections as you need to populate the items fields in your invoice template, for this template, 19 more.
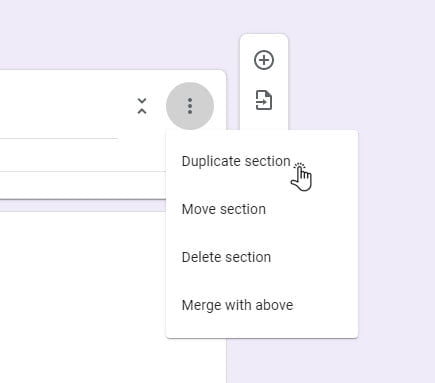
On my form, I have created only 5 sections, so I can populate maximum 5 items in the invoice. In case you missed it, here is the link that will create a copy of my form in your Drive: Generate Invoice Form. I recommend creating your own form from the beginning.
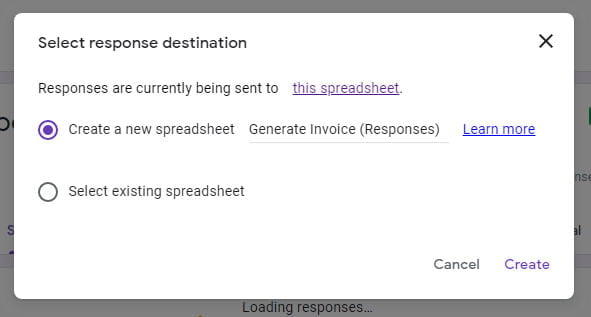
Next, you need to select a spreadsheet to set it as a form responses destination. To do that go to the responses tab on your Form and click on the spreadsheet icon or from the three-dot menu select the “Select response destination” option. In the next dialog, it will give you the option to create a new spreadsheet to collect the answers.
Create an Invoice Template in Google Sheet
If you don’t want to bother creating one, I have prepared one for you here: Invoice print template. You can just copy and paste the whole thing in the new sheet in your Generate Invoice (Responses) spreadsheet. You can create one yourself, just be careful not to make it bigger than the page size.
Here is how my template looks:
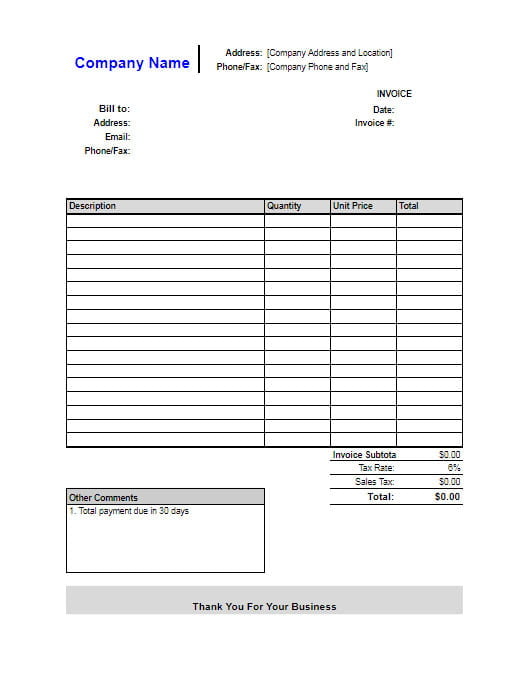
Now, that you have created the template, we can insert the formulas to get the latest data from the form responses. What I’m planning to do is to insert formulas that will get the latest data, so whenever I open the sheet (invoice template) I will always have the latest data there. Later we will create another sheet that can get the invoice data on request.
Add an Auto Number to Form Responses
Before we continue we have to identify each invoice with an invoice number. This, usually in databases, is set as an autoincrement number or a special number generated by some program. Since we don’t have that ability in Google Form and it doesn’t have an option for that, we can solve this with a formula in Sheets.
First, we need to create an empty column to insert this formula. What I recommend doing is to insert one column in front of all the other columns, so instead of the responses starting with “Timestamp”, it will start with the invoice number. To do that just right-click on the column heading on the first column and select “Insert 1 left”.
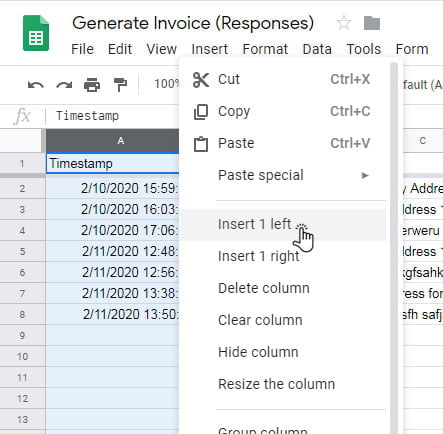
Now, add the name “Invoice #” for the first column and in the cell (A2) insert the formula to get the invoice number.
I’m not going to go into detail on how this formula works but in short, it checks a column if it contains a value. Red more here: Add Auto Number to Google Form Response Sheet.
The expression that gets the number is:
=ROW (A1:INDEX (B:B,COUNTA (B:B)-1))
This formula will return a number of the row if it finds value in the same row in column B. If you are ok only with a number, then add ARRAYFORMULA function for this formula and with every new input, it will generate a number.
What I did is I used this number and construct a more complex expression. Here is my formula:
=ARRAYFORMULA (VALUE ("32" & text (ROW (A$1:INDEX (B:B,COUNTA (B:B)-1)),"000")))With this formula, instead of getting value “1” I will get value “32001”. You can include letters “AB” instead of the number “32” and the formula will generate value like “AB001”, but you have to remove the VALUE function from the formula.
Formulas to get the data from the responses
Finally, here is my spreadsheet with the invoice template and all the formulas: Generate Invoice (Responses) Sheet
To get the data from the form responses I use the FILTER function. This function returns data based on one or more conditions, you can read more here: FILTER function. Also, here is one article ” How to Google Form Responses ” to get you started with working and filtering values from the “Responses sheet”.
The main problem that we need to solve here is to create a formula to get the latest invoice number. After we get the latest invoice number, we can use it to filter all the data from the “Form responses 1” sheet.
So, in the cell F6, where the “Invoice #” is located, add this formula:
=INDEX ('Form responses 1'!A:A , COUNTA ('Form responses 1'!A:A))What this formula does, is it counts the cells with values in column A, using COUNTA function. And then using the INDEX function returns the content of the last cell in the same column. Read more about the INDEX function here.
Now, that we have the latest input from the form, located in the cell F6, we can use it to filter values for the rest of the template.
For example, to get the name of the company we are going to use this formula:
=FILTER ('Form responses 1'!C2:C, 'Form responses 1'!A2:A=F6)Whit this formula we will get the value from the range “‘Form responses 1’!C2:C” (the name of the Company) if the invoice number in the range “‘Form responses 1’!A2:A” is equal to invoice number in cell F6.
To populate the other fields, like email or address, add this formula and change the range for the corresponding field.
We will use the same procedure to populate the Items in the invoice, so for each item that we have in the form, we are going to add a separate formula. But we cannot filter the whole range because the template has merged cells and it can’t display the whole range.
For example, if we filter the range “‘Form responses 1’!H2:J” (data for the first product: name, quantity, and price) in the cell A13, it will try to display the values in A13, B13, and C13 correspondingly. But they are all merged in A13 cell, so it will display only the value from the first column.
To avoid this in our template, in the cell A13 add formula to filter values for the range “‘Form responses 1’!H2:H”, and in the next cell D13, add formula to filter values for the range “‘Form responses 1’!I2:J”, columns that holds the Quantity and Price values.
For the next item we have to add the formulas again, but this time the range will change correspondingly. For example, the next item, in the Form responses is located in the columns L (product), M (quantity) and N (price). So, in the cell A14 we will filter range “‘Form responses 1’!L2:L” and in the next cell D14 the range “‘Form responses 1’!M2:N”. And so on, until we include all the fields from the Responses sheet.

Next, the cells whit the unit price should be formatted as currency. Select the cells and click on the “Format as currency” button from the toolbar.
For the “Total” field, we need to multiplay Quantity and Price cells, so the formula is going to be “=D13*E13” for the F13 cell. But if we copy and paste this formula for the rest of the cells we will get “$0.00” value for the empty cells. Check the image.
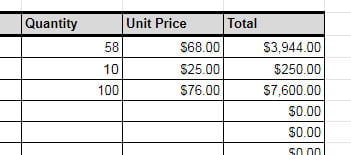
To avoid this use the IF function to check if the value is zero, so if it is you can return an empty value. This formula is going to look like this:
=IF (D13*E13=0, "", D13*E13)
IF function: Returns one value if a logical expression is TRUE (empy string – “”) and another if it is FALSE (D13*E13).
Next, add the formula to calculate the Totals and Tax and that is it. You can add formula to add the comment at the end of the invoice, you can check the sheet for that.
Now go ahead and test your Generate Invoices app. Fill in the form with data and check the sheet for the new data. You can now print the template sheet or export it as a PDF.
If you want to print a different invoice, just duplicate the invoice template and remove the formula from the Invoice number and add the number of the invoice that you want to print. Check my spreadsheet, the “Custom Invoice” sheet.
The next step is to create a Google Script to save the invoice as PDF in your Drive and/or send it as an attachment in an email on Form Submission. You can find the article here: Google Spreadsheet Script to create and email a PDF on Form Submission
Also, you can use an extra column on the Response sheet and add a Checkmark to track the Payments. You can also create a sheet with formulas to display only unpaid invoices based on that column.
