
A free and open-source Google Sheet based Inventory Management System (IMS)
If you’d like a real inventory tool and don’t want to pay month-to-month fees—or give up the comfort of Google Sheets—this is the one. I created a complete IMS on top of a spreadsheet with Google Apps Script. It works on a personal Gmail account or a Google Workspace (business) account, stores all data in your own spreadsheet, and introduces features that most individuals and small businesses actually need.
What you will get
- Products & Inventory: live quantities, low-stock indicators, selling price from markup, and a full product profile.
- Purchases: create purchase invoices, auto-suggest unit prices, update cost using Weighted Average Cost (WAC), and keep supplier price history.
- Sales & Invoicing: create sales invoices, auto-fill prices, optional tax, print-friendly invoices, and email PDF invoices to your customer (and to you).
- Controls & Safety: prevent negative stock on edits/deletes, block deletion of products that are in use, and track stock movements.
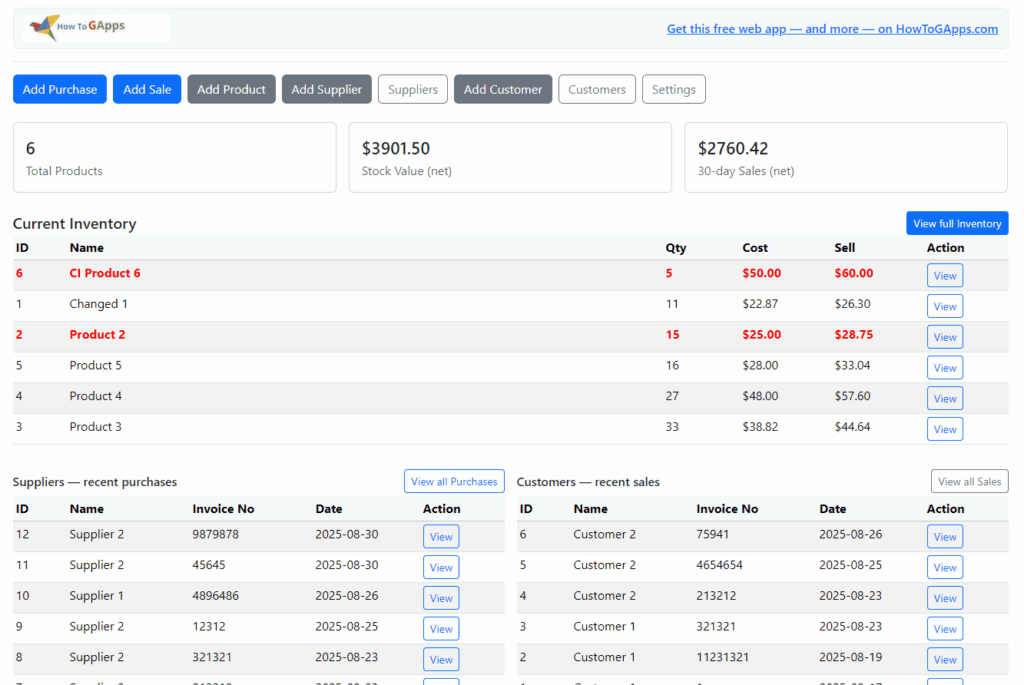
- Dashboard: KPIs, recent purchases & sales, quick “View” actions, and a current inventory snapshot.
- Settings: choose your currency symbol and placement; store your info for invoicing.
- All data lives in your Sheet. No external database. No vendor lock-in. No monthly payments. Be in control of your data.
You can test the web app here: IMS Web App
Key features in detail
1) Products & Inventory
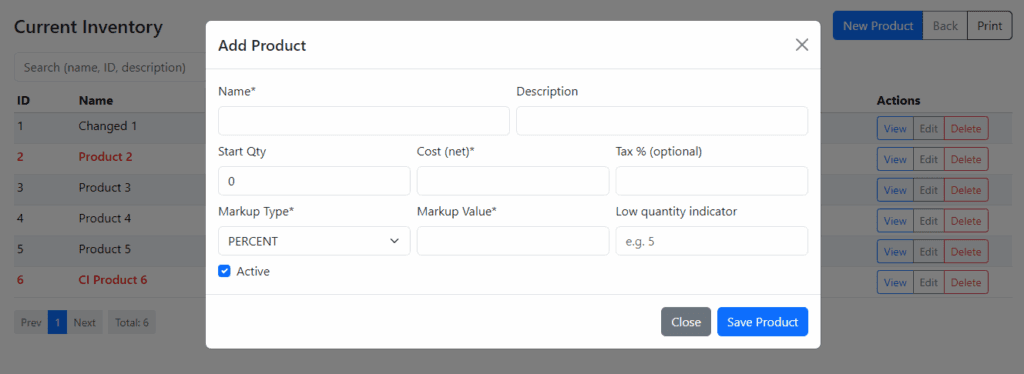
- Product master with cost, markup (Percent or Fixed), and computed sell price.
- Low-stock indicator per product (you define the threshold).
- Weighted Average Cost auto-recalculated on purchases—sell price updates automatically based on your markup rule.
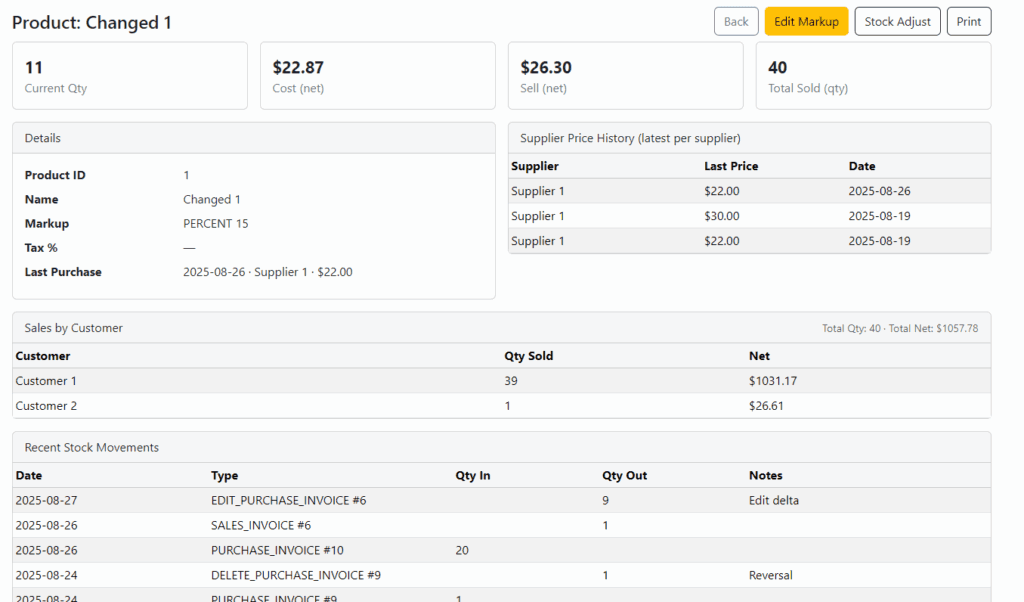
- Product profile: last purchase (date/supplier/price), complete supplier price history, sales by customer, and the 20 most recent stock movements.
- Stock adjust action to set counts directly (creates a movement entry for traceability).
- Inventory list page with client-side search, pagination, and row actions (View product, Edit basic fields, Delete if unused). Low quantities are highlighted in red.
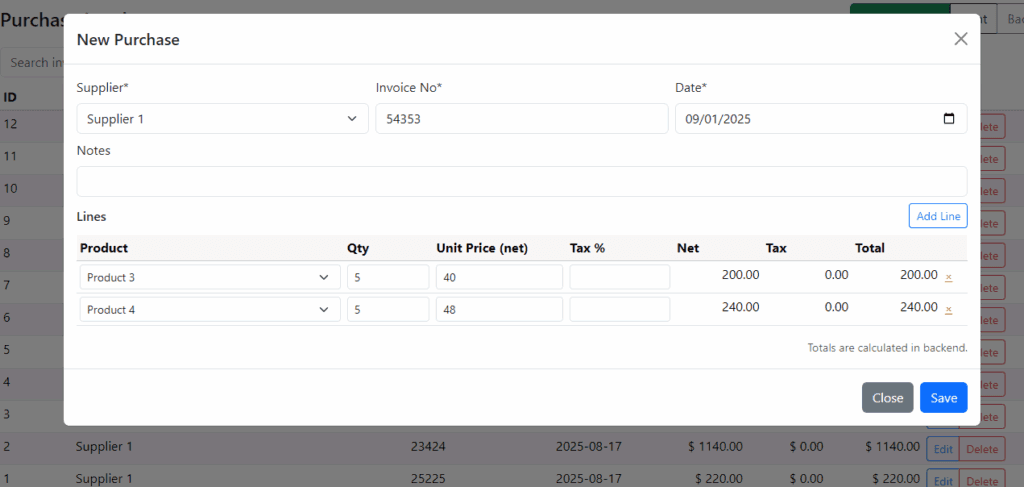
2) Suppliers and purchasing management
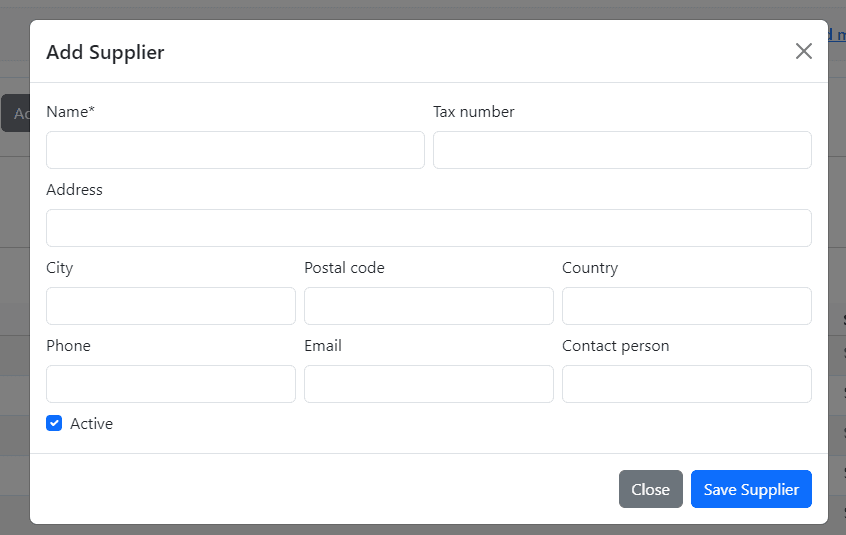
- Create purchase invoices with line items.
- Smart price suggestion when entering a line:
- Latest supplier price (from price history),
- Otherwise the last price you paid to that supplier,
- Otherwise the product’s current cost.
- On save, system computes the totals and updates WAC for the product; adds a stock-in movement and records the price in Supplier Price History.
- Edit & Delete, safely: updates stock by the exact delta; blocks actions that would push a product below zero; rewrites movements; recomputes average cost for affected products.
3) Managing Customers, Sales & Invoicing
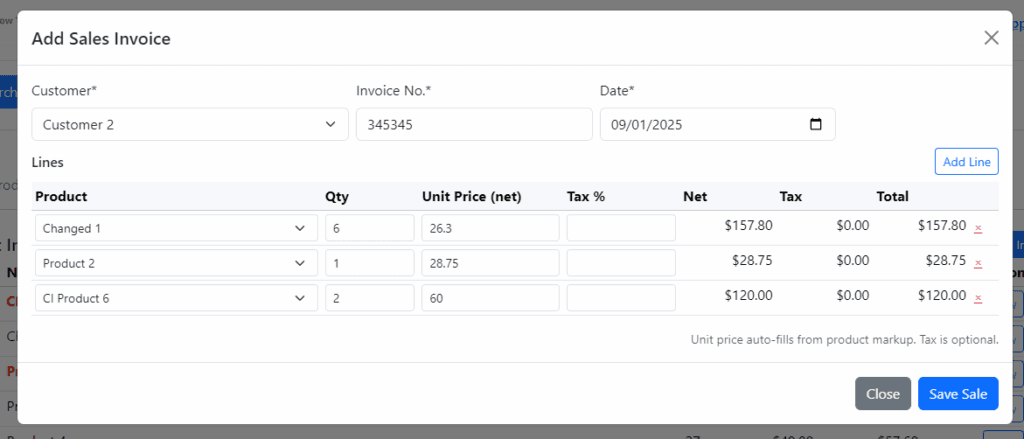
- Create sales invoices with line items. Price auto-fills from the product’s current sell price (you can override manually).
- Optional tax per line (blank = no tax).
- Negative-stock prevention: quantity inputs validate against available stock, and safe edit/update logic prevents stock from going below zero.
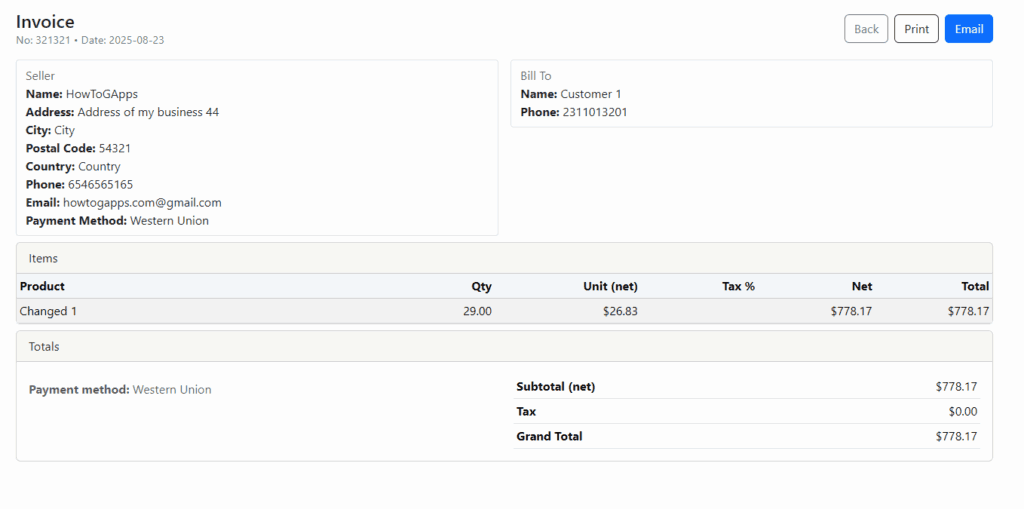
- Invoice page (print-ready): clean “Invoice” layout with your seller info and “Bill To” details side-by-side, items table, and totals (Subtotal, Tax, Grand Total).
- Email as PDF: one click to generate a PDF and email it to the customer—and to you.
- Sales list page: client-side search, pagination, “View” (opens printable invoice), “Edit,” and “Delete (safe)”.
4) Dashboard
- KPIs: total products, stock value (net), and last 30 days of sales (net).
- Current Inventory: quick read on what’s in stock; low stock is clearly marked.
- Recent Purchases / Recent Sales: compact tables with View buttons to jump right into the invoice detail.
5) Settings
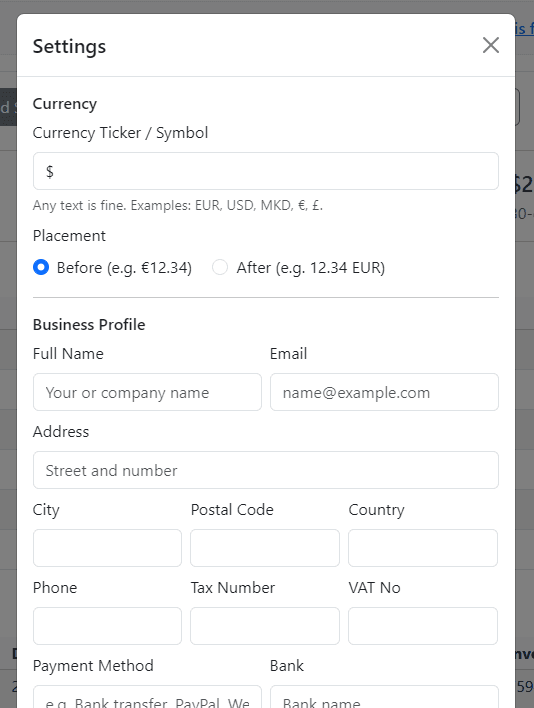
- Currency display: set a symbol (EUR, USD, MKD, €, £, etc.) and whether it shows before or after the number. This is display-only; raw numbers remain numeric.
- Seller (User) profile: the USER sheet stores your billing identity (Full Name, Address, City, Postal Code, Country, Phone, Email, Tax/VAT, Bank details, Payment Terms & Method).
- Payment method can be anything you use—PayPal, Bank transfer, Western Union, etc.
- Only the fields you actually fill appear on the invoice.
6) Print-friendly everywhere
- Tables expand to page width; actions/buttons are hidden on paper.
- Letter and A4 are supported with CSS tailored to avoid truncation.
- Invoices look like invoices—no “spreadsheet look” on printouts.
Who it’s for
- Individuals & small business that outgrew a simple list but don’t want a heavy ERP.
- Google Sheets users who want full control and portability.
- Teams on Google Workspace who prefer something open and extensible.
Why Google Sheets + Apps Script?
- Runs under your personal Gmail or Google Workspace account.
- No external database: your spreadsheet is the database.
- Easy to audit, backup, export, and extend.
- No vendor lock-in; the code is yours.
- No monthly payments for servers.
- Best security, if selected, only your google (Gmail) account or domain under Google Workspace can access the app.
How to Get the App
Follow these steps to copy and run the app in your own Google Account.
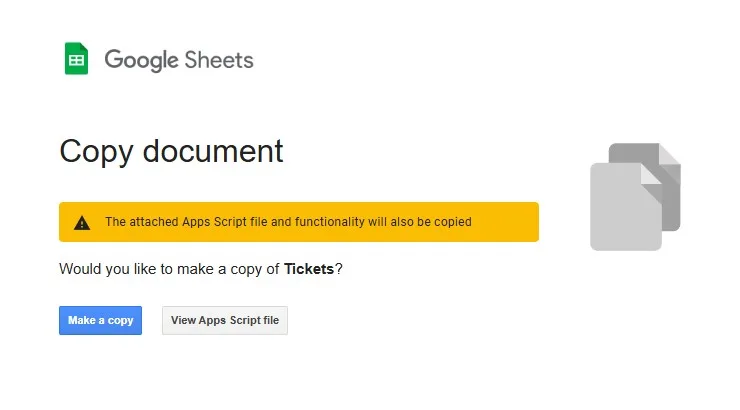
Step 1: Copy the Spreadsheet
Use this link to copy the spreadsheet to your Google Drive:
Make a Copy of the Inventory Management System (IMS)
You’ll see a confirmation window — just click “Make a copy”.
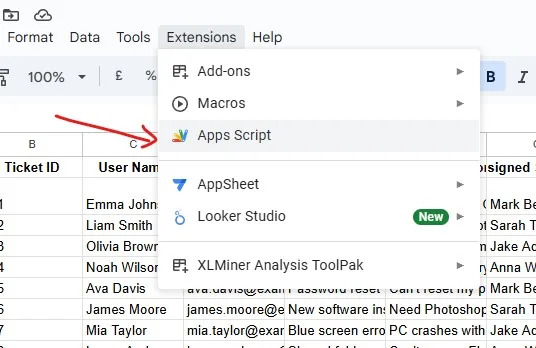
Step 2: Open Apps Script
In the copied spreadsheet, go to:
Extensions → Apps Script
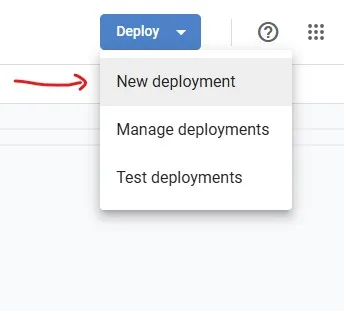
Step 3: Deploy as Web App
In the Apps Script window, click Deploy → New Deployment
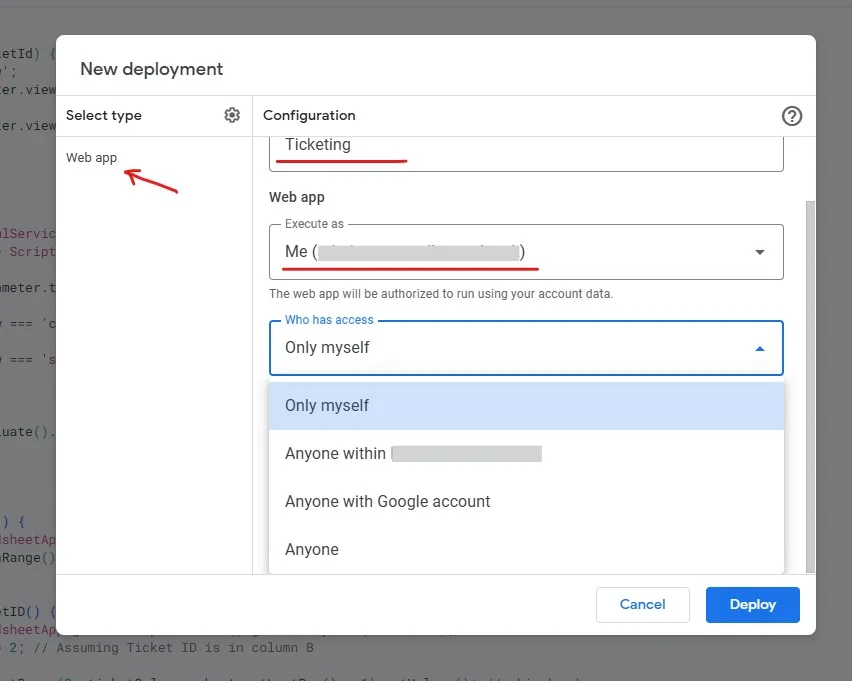
- Select Web App
- Add a name in the Description
- Set:
- Execute as: Me
- Who has access:
- Only myself – only you can use it
- Anyone – anyone with the link can use it
- Anyone within “your domain” – only users in your Workspace
- Anyone with Google account
Step 4: Authorize the Script
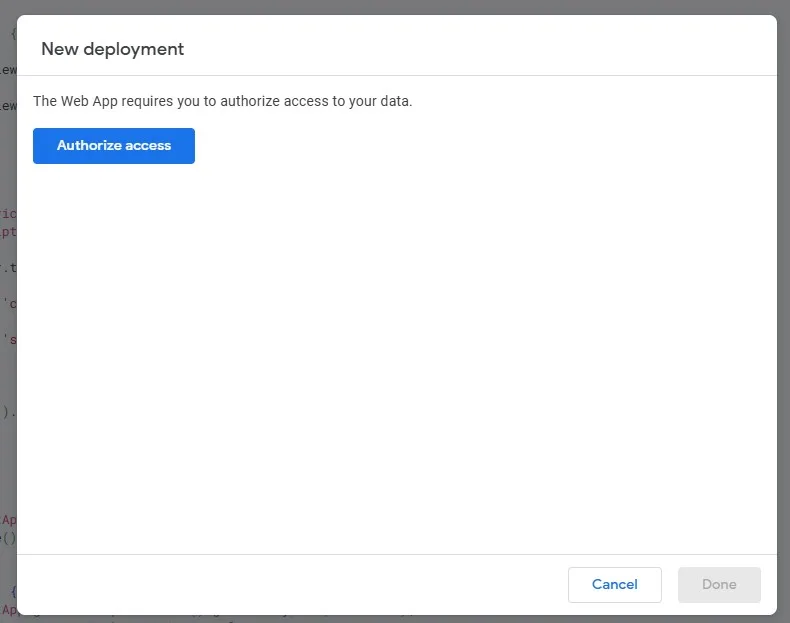
You’ll be prompted to review permissions. It will ask to:
- View, edit, create, and delete your Google Sheets
- Send emails as you (used to notify assigned staff)
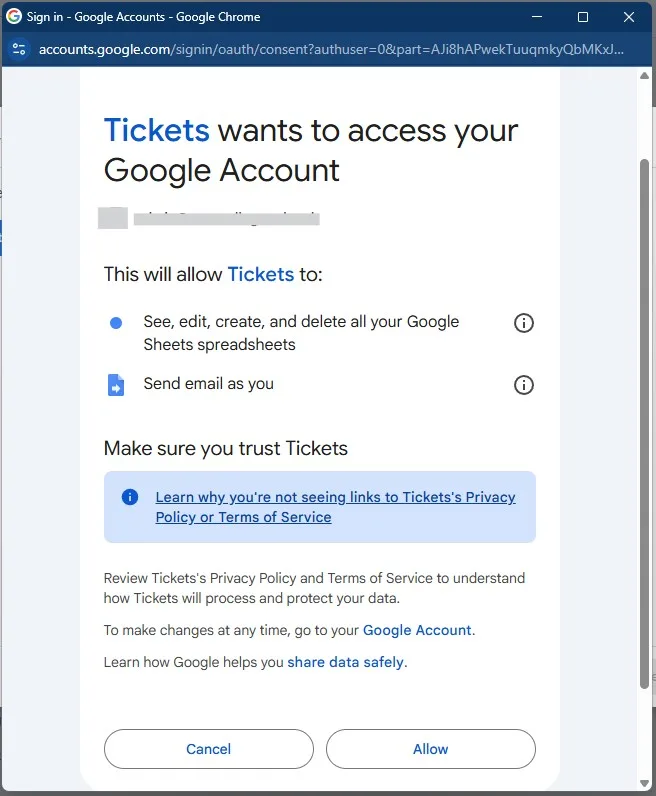
For detailed instructions on allowing permissions, see this guide: How to accept Google Script permissions
Step 5: Get the App URL
After authorization, the deployment window will show your live app URL.
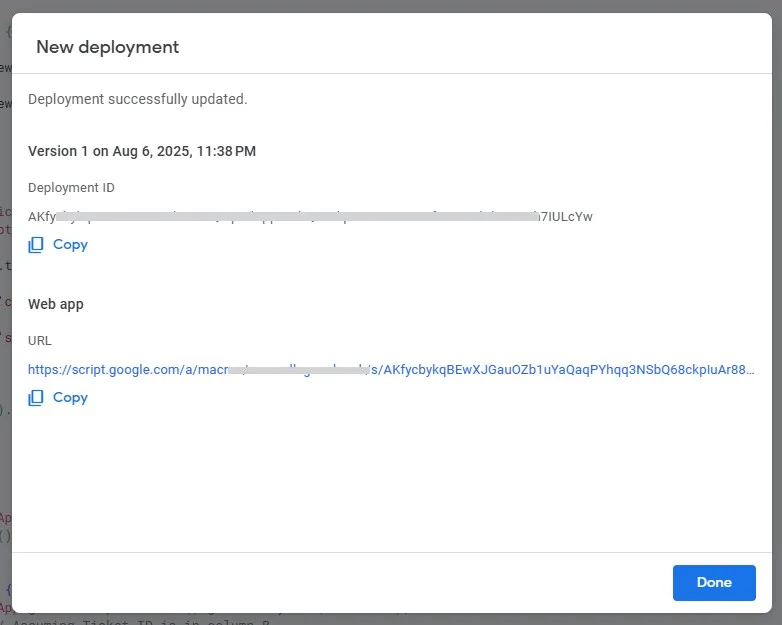
You can now share this link or bookmark it for future access. It’s mobile-friendly and works anywhere you have internet.
Quick Start guide
Set currency & your business details. In the app, open Settings:
- Currency: choose symbol (EUR, USD, MKD, €, $, £, etc.) and position (before/after).
- Seller (User) profile: fill Full Name, Address, City, Postal Code, Country, Phone, Email, Tax/VAT, Bank, Account No, Routing No, Payment Terms/Method.
Only filled fields appear on invoices.
Add master data. From the dashboard, first add Products, Suppliers, and Customers (use the “Add …” buttons).
- Add Products: you can set cost, markup type (Percent/Fixed) + markup value → sell price is auto-calculated. Don’t add Quantity, you will add product quantity when making a purchase invoice, it’ better for tracking. Optional: set Low quantity indicator per product.
- Add Suppliers and Customers so you can create purchase and sales invoices.
Seed stock with a Purchase
- Click Add Purchase → choose a supplier → add lines.
- The app suggests a unit cost (latest supplier price → last purchase → product cost).
- Save to update inventory and Weighted Average Cost (WAC) automatically.
Make a Sale & invoice
- If you have just added a product quantity through Purchase invoice, refresh the page so the quantity check in the sales invoice is updated.
- Click Add Sale → choose a customer → add lines. Prices auto-fill from product sell price; tax per line is optional.
- Save, then View the invoice to Print or Email as PDF (sends to customer and to you).
Use the views
- Inventory: search, paginate, quick “View product,” edit basic fields, delete available only if unused.
- Purchases/Sales lists: search, paginate, View invoice, Edit, Delete (with safe stock checks).
- Dashboard: KPIs (stock value, last 30-day sales), recent purchases & sales.