Google Meet is an app for video conferencing and it is a part of the G Suit. Now, in the situation with coronavirus and stoping the classic classroom learning, educational institutions that have G Suit for Education can now use the Google Meet app and start the classes online, the famous distance learning.
What can you do with Google Meet for your online teaching:
- start, schedule or join an online classroom
- use your computer, laptop or your mobile to join
- dial-in with your phone
- present your entire screen or a window
- turn on captions
- chat
- record the class
- see the list of students attending the class
To have a successful online class you will need to schedule/create a Google Meet session, include a presentation or a video in your class, use the available tools to manage the students and record the whole thing.
Schedule or Create a Google Meet session
There is a lot of different ways that you can use to start and invite members in a Google Meet session, but my task was to find the easiest way so the professors won’t have a problem with the use. What I did for my college is that I created all the classes and invite the professors and the students accordingly. You can ask from your IT department to do all this, but it is very simple and you have control over it, especially on the recorded material.
The best way to schedule or create a Google meet session is through the “Calendar” app. Just create a new event, pick the date and time, add guests (students) and add Conferencing (if not added automatically). That’s it, now go to https://meet.google.com and if the classes are for today, you will see it there and join in.
It is that simple, but if you don’t know your way around “calendar”, and Google apps in general, we will go in detail now.
To access your Calendar app following this link: calendar.google.com, or use your app drawer and click on the Calendar icon. In the Calendar app, click on the “+ Create” button or on any position on the calendar and add the details there.
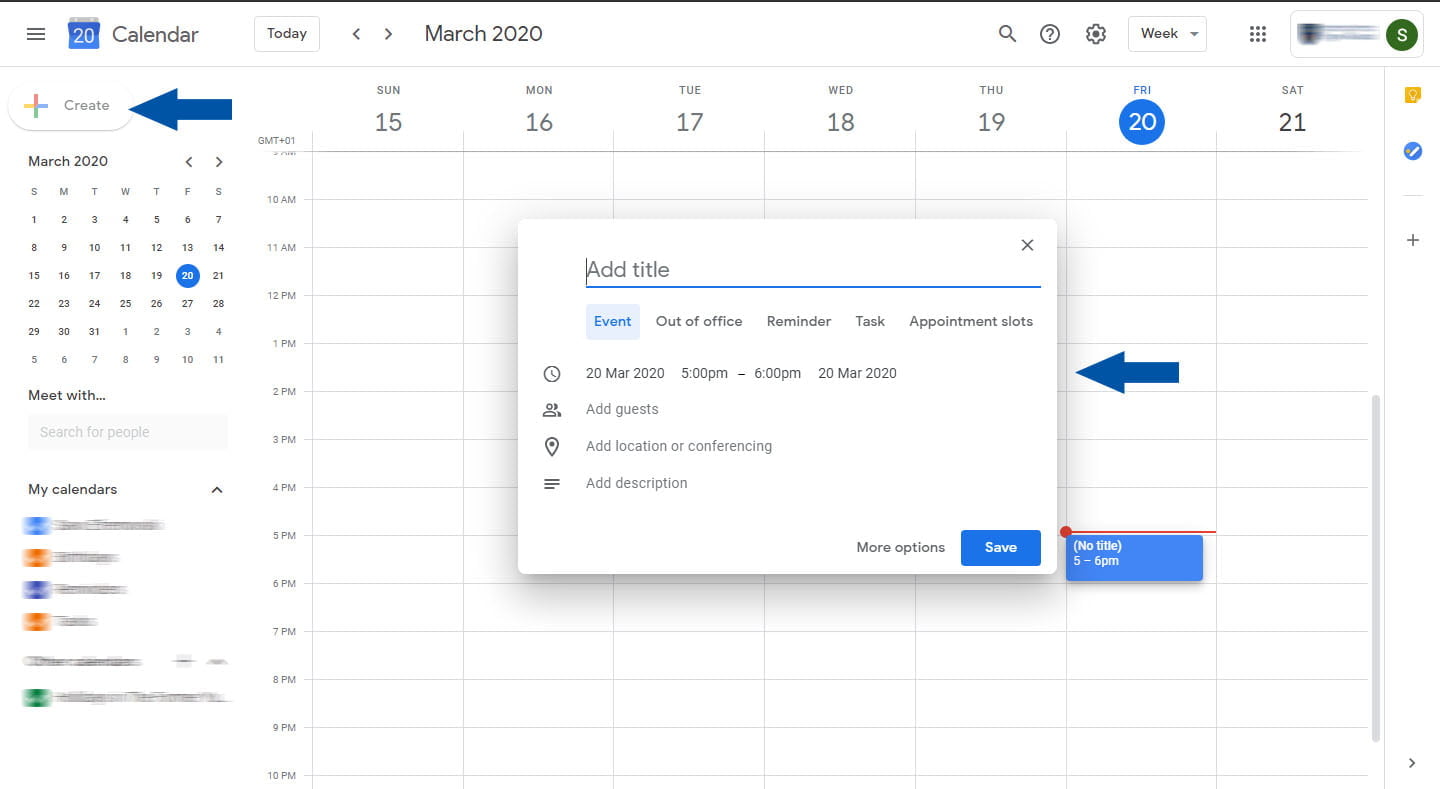
First, add a title for the event, it should be the name of the subject, something like “Modern Societies”. In the next line set the date and the duration of the class. The duration of the event should be the whole length of the class, you don’t have to specify all the consecutive classes with the same students. You can give brakes during the class manually by leaving and rejoining the call.
The next thing is to add guests, in our case, students. The students added to this event will receive a direct invitation to the class and the class will show up directly in their Google Meet app and as an event on their calendar. The good thing is that Google Calendar enables you to add a Google Group or a Google Classroom as a guest. So, if you have already created a Classroom or a Google Group with all the students that you tend to invite to the class, you can just type in their name.
You can see in the next image, I have added one group with students, it has an arrow next to is so you can check the list.
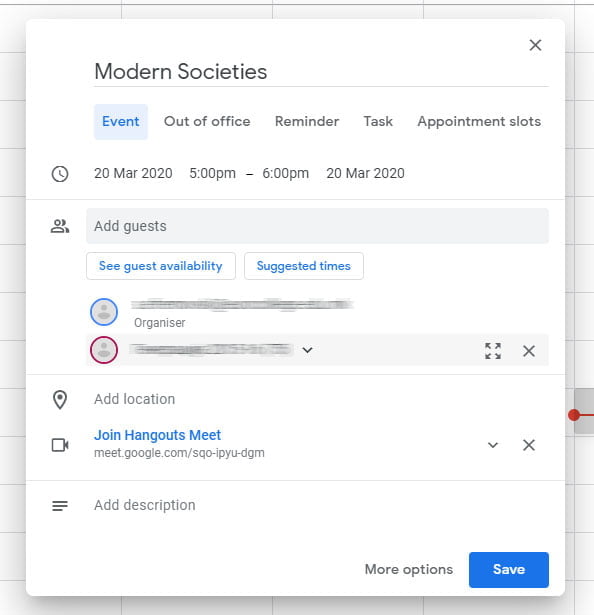
Next, I just have to press “Save”, but my G Suit setup adds a Hangout Meet automatically to each event. So, if you don’t see the “Join Hangouts Meet” link, you must create one.
To create an online meeting click on the “Add location or conferencing”, and click on “Add conferencing”.

Google Calendar will create a Google Meet session, on the given date and time, and display the link there.
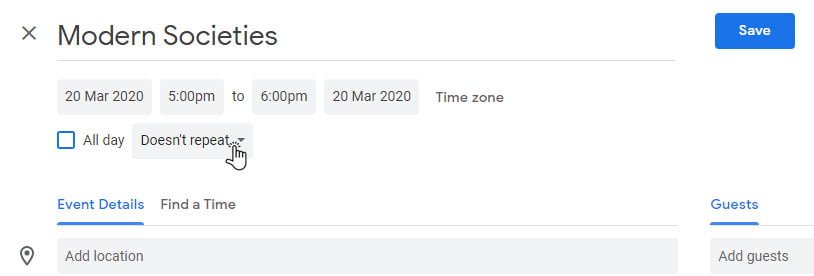
If your class is recurring every week at the same time you should access “More options”, right next to the “save” button. In the more option dialog, you have a drop-down list to set the repeat of the calendar even. You should select the “Weekly on …” option if your class repeats every week at the same time.
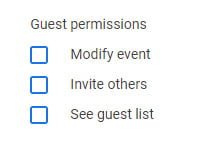
While you are in “More options” dialog, you might want to deselect all the “Guests permissions”. You don’t want your students to be able to add guests and modify the event, or maybe view the guest list.
After this, you can click on the “Save” button, and Google Calendar will inform all the participants for the scheduled class and add a notification. The students can follow the link in their email invitation or they can just access the Google Meet app and the scheduled class will appear there.
Join the Google Meet Session
You can join a Google Meet session from your browser or from your mobile phone using the Google Meet app. But if you want to do a presentation or play a video for the class you should join through your Chrome Browser.
To join in through Google Chrome you have two options. You can join the session by clicking the link on the email invitation you receive when you schedule the class. Or you just go to the Google Meet app by going to this address: meet.google.com
When you access the Google meet app and if your class is scheduled for today you will see it on the list. Something like in the following image:
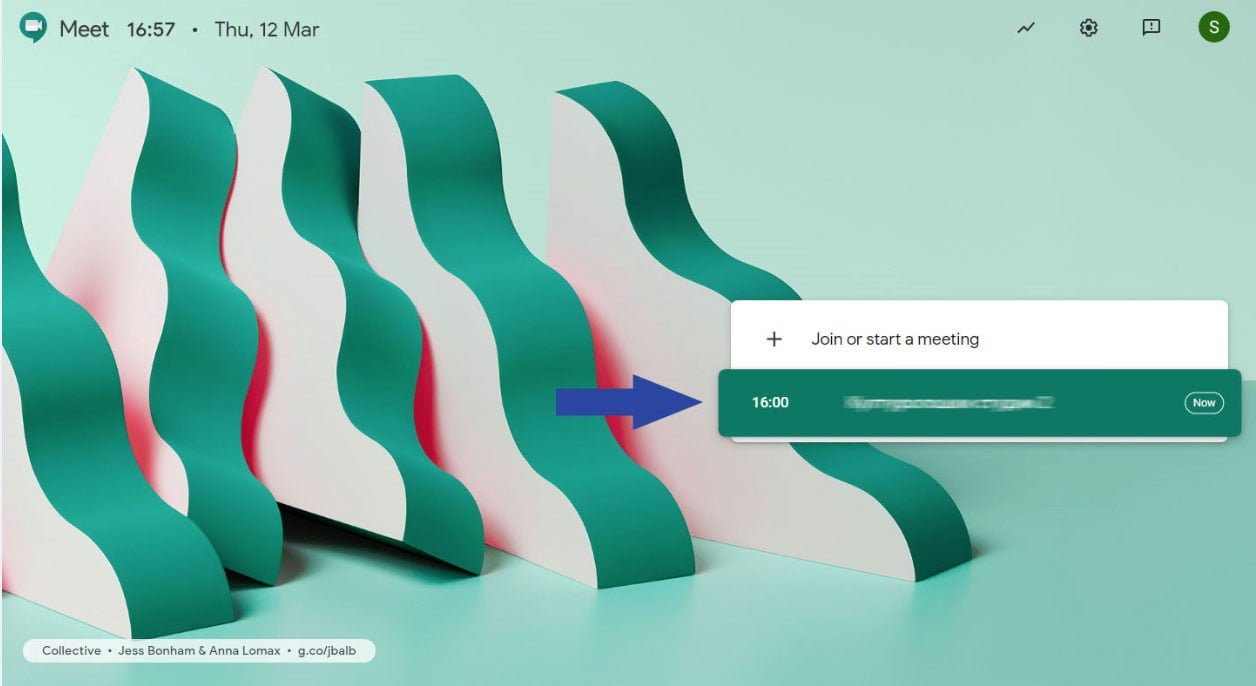
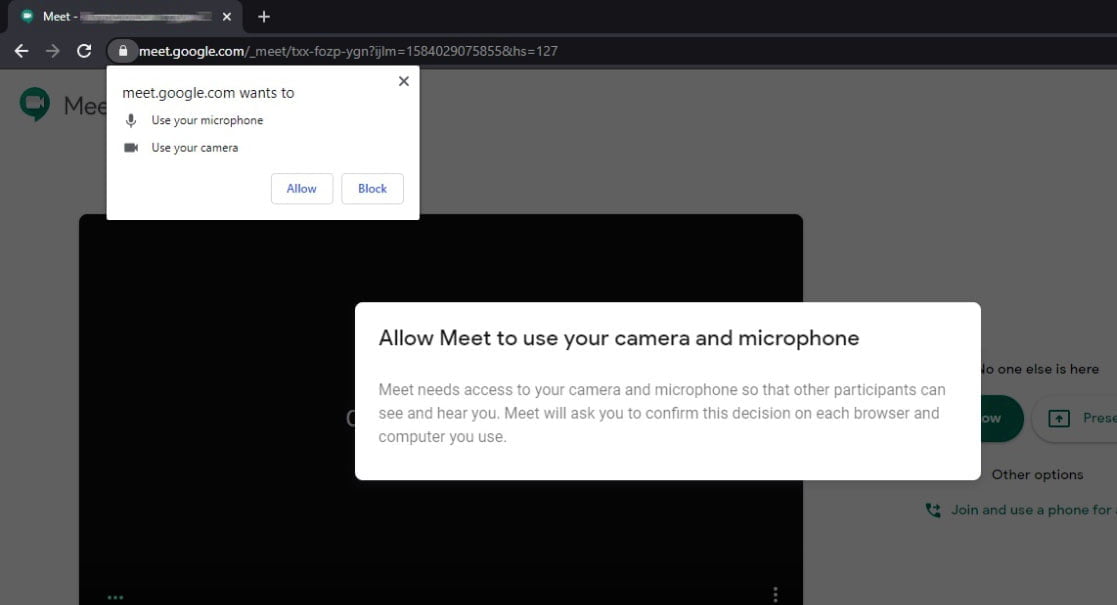
By clicking on your scheduled class, marked with a green, you won’t enter directly into the call. Google meet will display a screen to check if everything is working, like the camera and the microphone. Also, if this is the first time you start your Google meet app, it will ask you to grant access to use the camera and the microphone. Just click on Allow:
If all is OK, you should see the feed from your camera on the screen and you are ready to join in. On this screen, you can also see how many students are present in the class at that moment and also you can disable the camera or the microphone before you join.
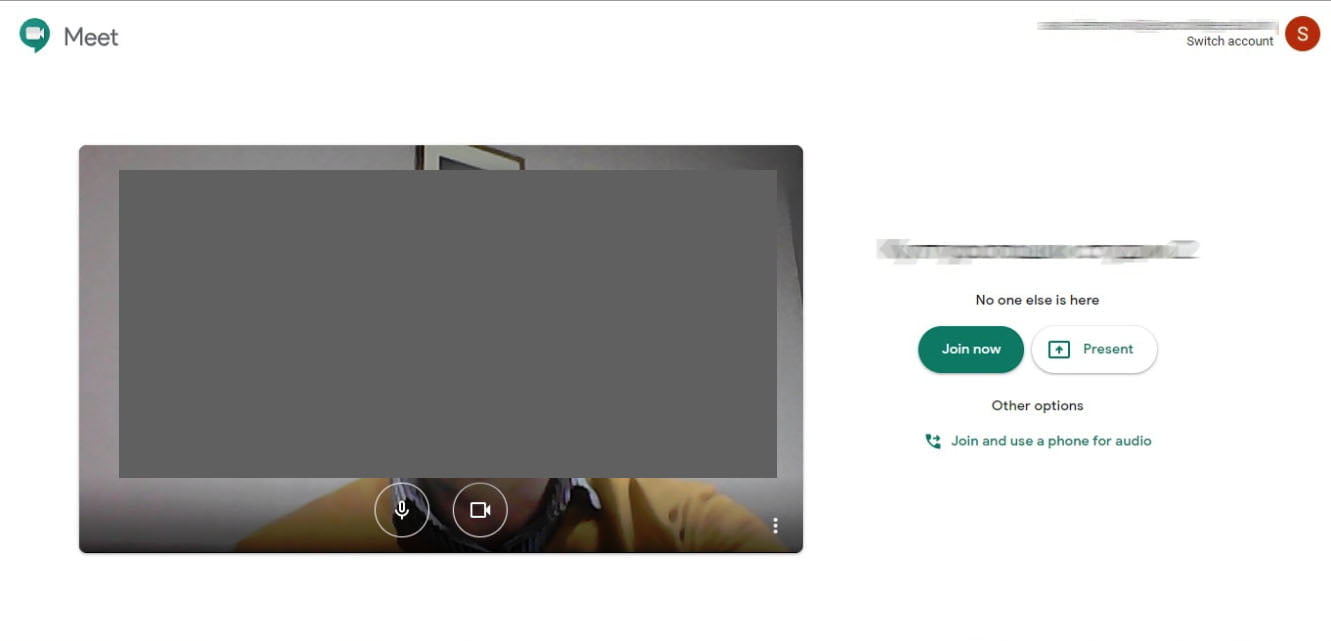
Next, click on the “Join now” button and you are in.
Google Meet Interface
When you join a Google Meet session, you will see a standard interface for video conference software. You will see the video feeds of all the participants, or just a profile picture if their camera is off.
The feed from the participant who is speaking at that moment is displayed on the screen of all the participants. This will be overridden if you or anybody else stars to present.
In the top right of your screen, you will see info about the number of persons attending the meeting/class, the chat button and the feed from your camera.

By clicking on the first icon you will see a filmstrip with the list of the students attending the class. From the list, you can pin, mute or remove a student from the class. If you click on the chat icon you will be able to send a text to all the participants.
In the bottom part of the screen, visible only if you move your mouse, you can find tools to control your Google meet session.

In the left corner is located the title of the meet session, and here you can find the details about the Google meet session. Here you can also find the attachments if any. You can add attachments when you create the meet session, in the “More option” part.
In the middle part, you have the option to mute/unmute your microphone (microphone button), exit the meet session (red phone button) and disable/enable your camera. (camera button).
Next to them, is the “Turn on captions” button, that you can use to enable the speech recognizing software to display captions as you speak. You can use the “Present now” button to start streaming your presentation or your screen instead of your camera. And there are more options if you click the three-dot menu on the right side.
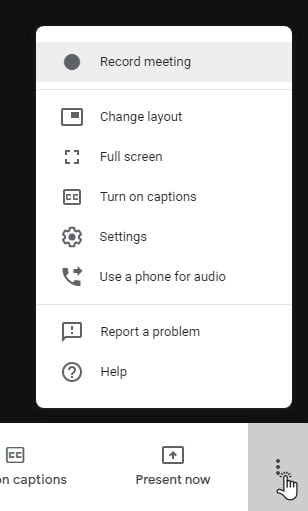
Here you can find options to record the class, go full screen, access the settings and more.
Using Present Now option in Google Meet
Using the “Present now” option you can start streaming your screen or a specific window to the students present in the meet session.
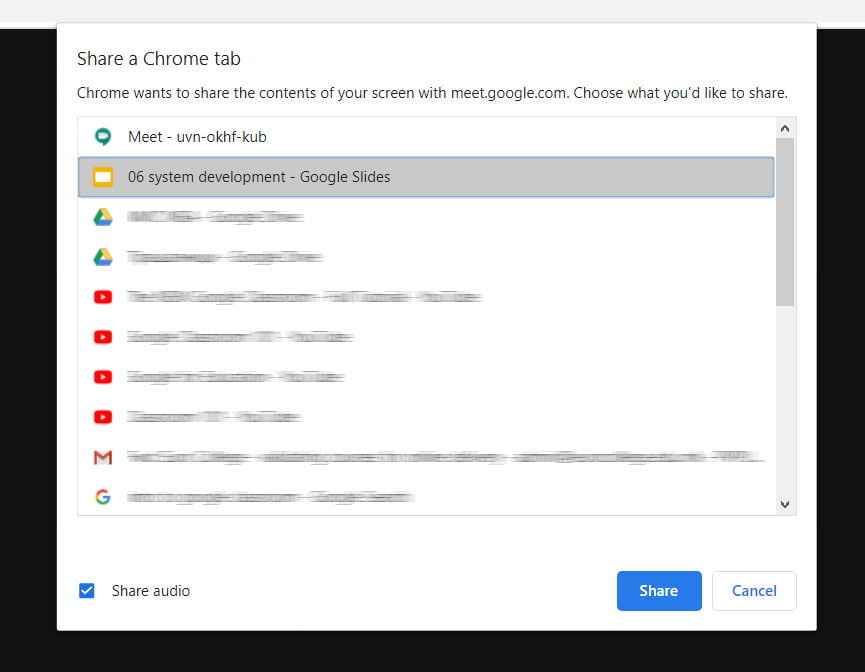
EDIT: Google had introduced a new function in Present now: “A Chrome tab” Best for video and animation. This option is best to stream a Youtube video to a Google meet class, you have a “Share audio” option to select. Also, it can help not to accidentally display content from other tabs in your browser.
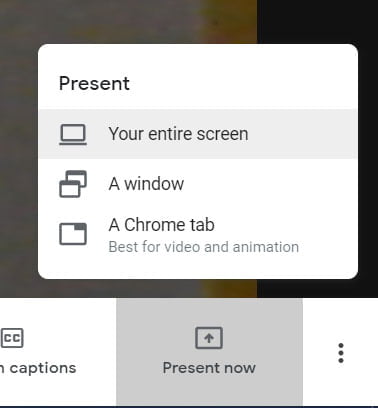
If you select the “Your entire screen” option, it will start to stream whatever you see on your screen. But if you select the “A window” option, Google meet will let you select what window to stream and it will only stream the content of that window, regardless of what you see on your screen. So, when you select “A window” option, a dialog is going to appear to let you select the window you want to stream, so make sure you open the program first. You can see that I have the Microsoft PowerPoint window that I can stream to the class.
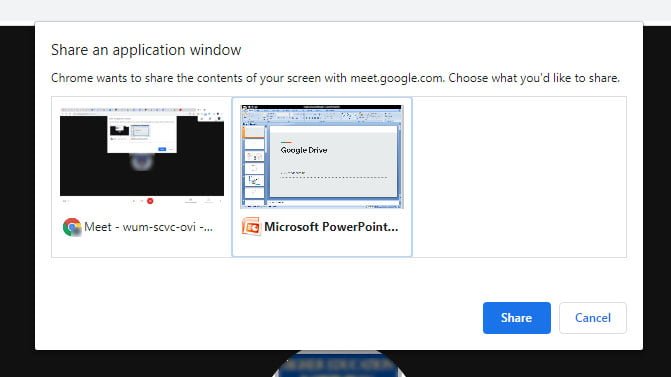
If you don’t see your window here just make sure it is not minimized.
After you select the window or a screen you want to stream, just press the “Share” button and the stream will be active.
You will have a notification on the bottom of your screen that you are streaming and by using this notification window you can end the stream.

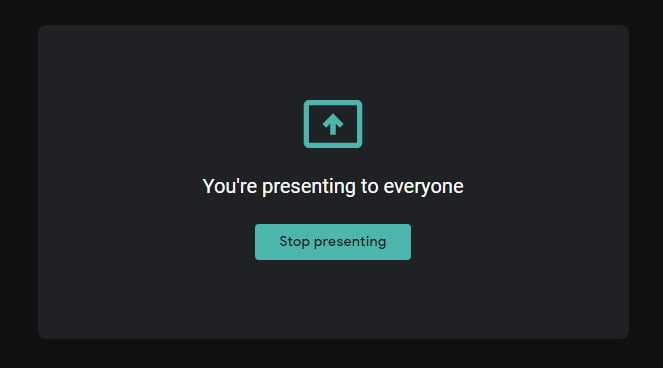
If you return to your Google meet app while you are streaming, you will have info on the screen that you are presenting to everyone. You can also end the presentation from here by pressing “Stop presenting”.
Sharing a Chrome tab
If you select to present “A Chrome tab”, you will see a list of your open tab and you can select which one to stream.
On the tab that you are sharing, you will get a notification located on the top of the page, and you can stop the sharing from there.
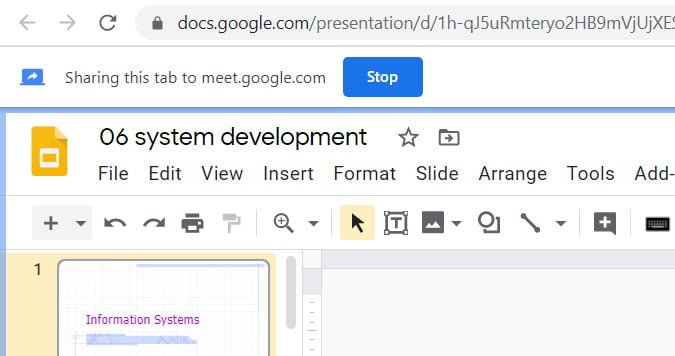
If you want to share another tab you don’t have to stop the sharing and repeat the whole procedure, you can just navigate to the tab you want to share and select the “Share this tab instead”.

Record Google Meet session
To record your class just access the menu located in the bottom right corner of the app and select “Record meeting”. Before it starts recording the class, it is going to inform you that you need to ask for consent from the other members in the session. Press Accept, of course if everybody agrees, and the recording will start.
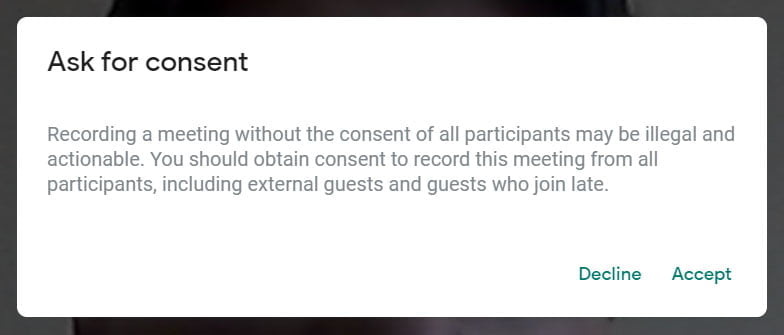
All the participants will be informed that the meeting/class is recorded.
You can end the recording by accessing the same menu as starting the recording, or it will end automatically when everybody leaves the meeting.
Note: When you give a break and exit the session, stop the recording and start it back on when you join in. It won’t stop when you exit, it will stop if everybody leaves.
Where can I find my recorded Google Meet session?
Shortly after you end the recording you will receive a mail from “meet-recordings-noreply” with your recording as an attachment. Actually, the recording is placed in the “Meet Recordings” folder in your Drive. You can find all of them there.
How to share the Google Meet recordings?
To share your recorded Google Meet class just forward the mail that you receive with the recording. Because the recording is prive, only you can access, Gmail will ask you to give permission for sharing. You can share it only with the persons specified in the forwarded mail, or you can select “Turn link sharing on” for your institution.
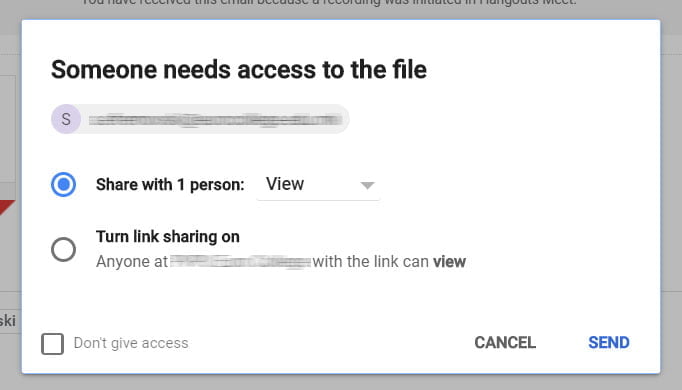
Also, Google meet recordings are like any other file located in your Google Drive. To share them just follow this guide: How to Share Files on Google Drive.
Ending the Google Meet class or giving a break
Basically, It is the same thing, you can leave the Google meet session by clicking on the red handset icon in both cases.
If it is the end of the class you can just close the tab or return to home screen, you can also rate the audio and video quality and help Google improve the meet app. If you intend to return to the class press the Rejoin button and you are back in.
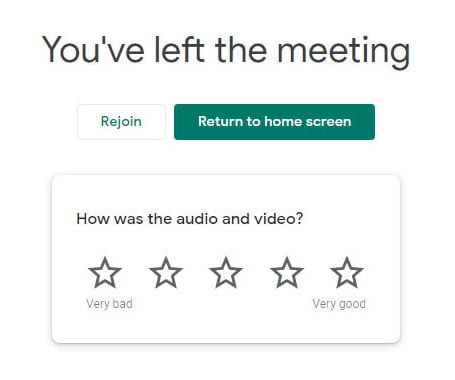
Note: If you are recording the Google meet session remember to start the recording back on when you Rejoin.
