To be able to use your email client efficiently, besides having a good interface, you need to be able to quickly search for messages and if necessary create a filter based on that search criteria and apply it to new messages. The most important thing in finding messages quickly is not only the speed of the search but also the results to be relevant to your search criteria.
The thing that Google does best is the search. So searching through your “1 million” emails to find a specific message is going to be instantaneous. Even so, Gmail is going to suggest the search therm while you type, and in most cases is going to predict the search term correctly, so you don’t have to type in the whole thing.
Search for Messages
The search box is always available on the top of your mailbox, to start searching just start typing the search term and you’ll get the suggestions right under the search box. Hit enter or click the search icon in front of the search term to display the results.

If you want to search the web instead just hit Shift+Enter and a new browser tab is going to open with the results from the web.
The results are going to be displayed chronologically, starting with the most recent mail that includes the search term. If you have a lot of messages that fit the search term you are going to have to scroll through them in order to get to the older messages. Because of this, you can not get the relevant results first, like in a regular search through the web. In order to get fewer results that are relevant, you will need to refine your search and use some advanced options. In order to do that you will need to click the arrow on the right of the search box, like on a dropdown box. If you want to go pro here is a list of google search operators to use on your search term. Using the options there you can narrow the search by providing some extra pieces of information about the mail you are searching for.
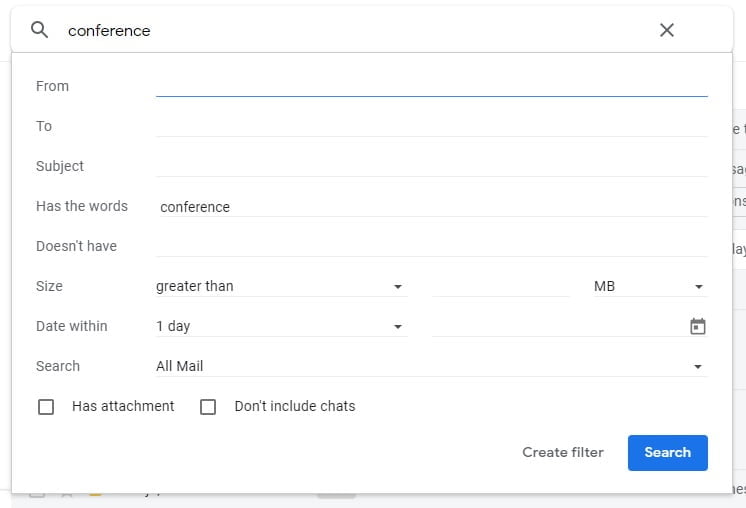
You can see that the search term is in the field “Has the words” which is not very specific if you want to find, for example, to be in the subject. Having all these options available you can refine the search, narrow the result and quickly find what you are looking for. Not to go in detail but you can search emails only from one person (fill in the “From” field) or you can select to search only emails with attachment if you select the option “Has attachment”.
You can also narrow the search result by selecting a specific time frame. In the field “Date within” select the appropriate time frame (it can be 1 day, 3 days, 1 week, 2 weeks, 1 month, 2 months, 6 months and 1 year) and then select the date of the time frame.
For example, if you remember that you receive the email somewhere in March or April, you can select 1 month and from the date picker (or you can just type it in) select the 1st of April 2019. That will tell Gmail to search within this time frame for the specific search term.
Now, that you are happy with your search result you can go ahead and create a filter.
Create Filter
So, what is “Create Filter” and for what is used. Because you can find the “Create Filter” button on the advanced search form, it is used to save the more specific search criteria that you are using regularly and automate the whole procedure. That means that when an email arrives that matches that search criteria can be applied certain options. You can see all the options available in the next picture.

Some of the more used options from the filter menu are “Skip the Inbox (Archive it)”, “Mark as read”, Apply the label:…”, “Forward it” and “Always mark it as important”. Personally, the most used option for me is “Apply the label:”. This helps me to stay more organized as I can automatically filter emails and apply specific Label (folder if you like). If you select this option, from the dropdown menu it will display all the available Labels that you have.
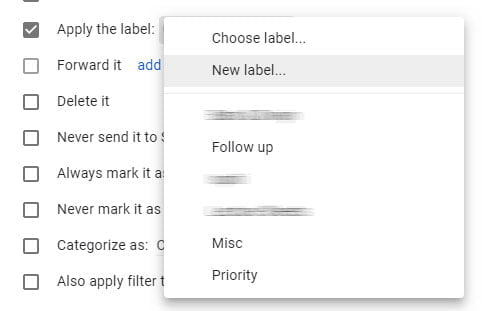
If you dont find what you need, or you don’t have a specific label for your filter, you can create one directly from this menu, just select the “New Label” option.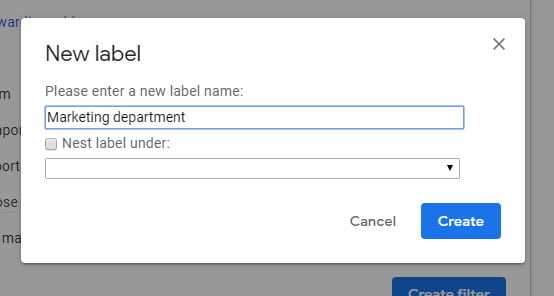
On this dialog, you can name your label (like “Marketing Department” on the image) and you can also nested under another label.
Note: Just remember, don’t use time frame or “label:”, “in:”, “is:”, or stars criteria (e.g. “has:yellow-star”) when creating Filters as they will never match incoming mail.
Edit and Delete Filters
You can find all the created filters in Settings, under “Filters and Blocked Addresses”. You will see a list of filters that you have created and also you can create and Import filters from this menu.
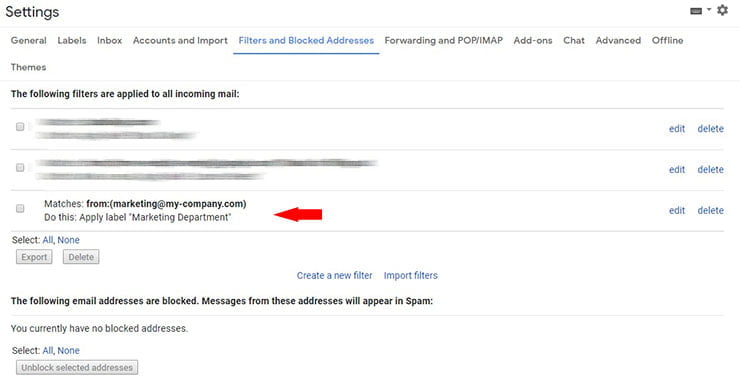
You can see the filter we created earlier, Matches: from:(marketing@my-company.com). You can now Edit or Delete the filter. The procedure to edit the filter is the same as creating the filter.
How to block a specific email address
To block specific sender you don’t need to create Filter and then select the “Delete it” options, just select the option Block “Name of the Sender” from the three-dot menu while you have your message open.
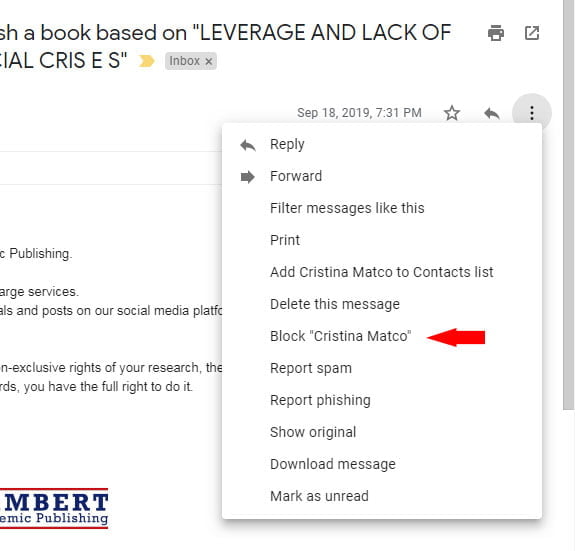
Just remember that you will have these messages appear in Spam. To remove a Block you will need to go to Settings, to tab “Filters and Blocked Addresses” and select the addresses that you want to unblock and click the “Unblock the selected addresses” button.
That’s it. if you have any questions just leave a comment and I will answer it as soon as possible.
