To send a Google Form with pre-filled responses is very easy, but if you want to create a pre-filled form in bulk, with different responses pre-filled for each user it is going to be a difficult and time-consuming task.
To create a link for a pre-filled responses for your form, click on the “Get pre-filled link” from the three-dot menu and fill the responses you want pre-filled and copy the link.
But if you want to send the pre-filled Form with different responses pre-filled for each user, you have to fill the responses manually and copy and paste/save the link for each individual person you intend to send the form to. To save you some time, in this tutorial I’m going to tell you how to create links for a pre-filled form in bulk.
First, you need to:
Create a link for a pre-filled form
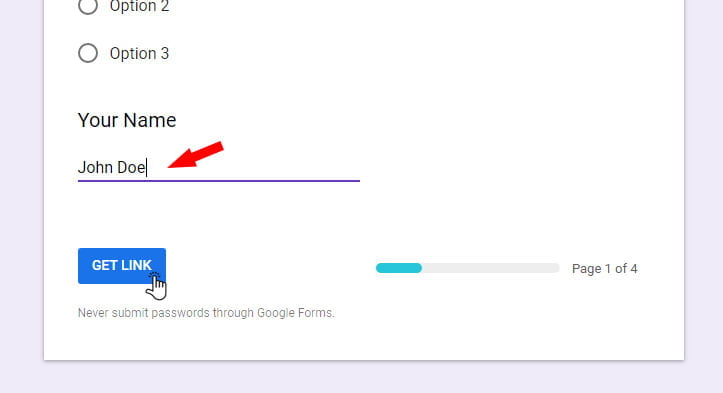
To create a link for a pre-filled form you need to fill the responses you want pre-filled and get the link. The procedure is very easy just click on the “Get pre-filled link” from the three-dot menu and the form will open in a new tab in preview mode. Here you can fill in the responses that you want to be pre-filled and click on the “Get Link” button at the bottom of your form.

After this you can copy the generated link from the popup that is going to appear in the bottom left corner, you won’t see the link but you will get a “COPY LINK” button. Just click on it and the link is going to be copied. Check the image:

The link is going to look something like this:

The link is very similar to the regular link you use to send the form, except now it has an addition at the end that is starting with an ampersand “&” mark. So, in this link, we have “&entry.280590041=John+Doe” as an addition to the regular link, which means that the entry registered under “280590041” number is going to get the value “John+Doe”. Exactly, it is going to get the value “John Doe”, without the “+” sign, because google forms replace the empty space whit the “+” sign.
So, now that you understand in what form the pre-filled link is generated, we can now use a spreadsheet to generate the links for pre-filled form in bulk.
Now, after we generated the link, we are going to
Use a spreadsheet to populate the values
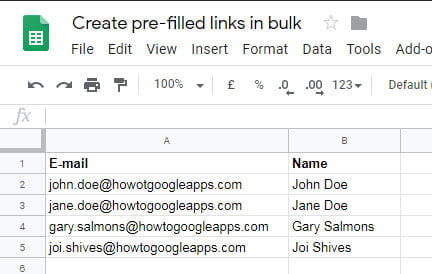
If you already don’t have a spreadsheet with the values for your pre-filled form, go ahead and create one in your Drive. We are going to use this spreadsheet to enter values that are going to be used as a pre-filled responses. I have a spreadsheet with names that looks like this:

The emails are not needed, you only need to create a list of “names”, but there is a tutorial here that can guide you to auto send the link to the email specified in the first field.
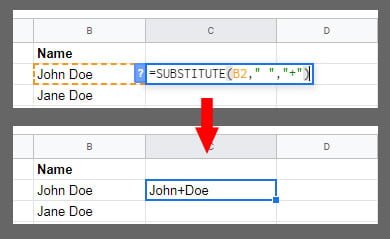
First, I like to get rid of the empty space in the name. Remember in the link “John+Doe”, not “John Doe”. So, I’m going to create a formula in the next cell, that will transform the empty space in plus “+” sign. For this, we are going to use the “Substitute” function to substitute the empty character with the “+” sign character.
SUBSTITUTE(text_to_search, search_for, replace_with, [occurrence_number])
To see the formula syntax and usage for the Substitute function go here: https://support.google.com/docs/answer/3094215?hl=en.
In the next cell, in this example C2, we are going to add the Substitute function that will take the text from the previous cell (the first argument in the function “B2”), search for the empty character (second argument ” “) and replace it with the plus sign (the third argument “+”). Here is how the formula in the next cell is going to look:
=SUBSTITUTE(B2, ” “, “+”)
Here is how it looks in my spreadsheet:

Now that the formula is working as it is supposed to, we can copy it in the other cells.
Next, in the D column, we are going to paste the generated link from the previous step, for a pre-filled form. But we are not going to paste the whole link, we are going to leave out the last part “entry.280590041=John+Doe”. My link is going to look like this:
https:// docs.google.com/ forms/ d/ e/ –truncated text–/ viewform?usp=pp_url&
We will paste this link in all the rows in order to create the final link. There is a more elegant solution for the final formula, you don’t have to paste the link in all rows, but for this example, I want it to make it as clear as possible. By the end of this article, I will add the whole solution in one formula.
Here is how my spreadsheet looks like now:

For the final formula, we are going to use the CONCATENATE function. This function is used to concatenate two or more strings from different cells into one string.
CONCATENATE( string1, [string2, …])
To see the formula syntax and usage for this function go here: COCATENATE function
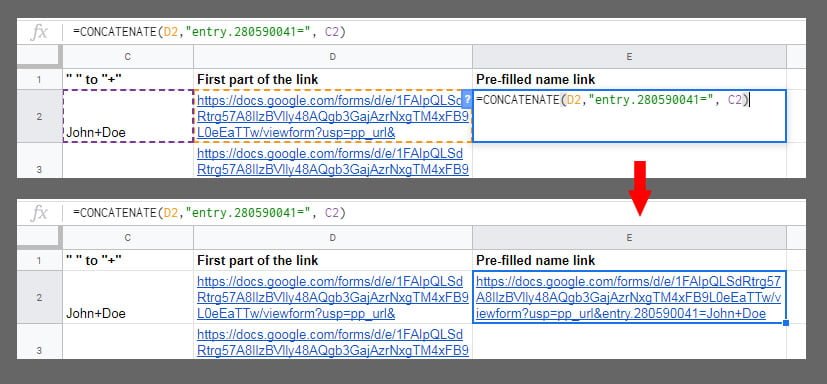
So, in the next column E, we are going to add the concatenate function with the link as the first argument (string1 = D2), for the second argument we are going to add the string “entry.280590041=” (string2 = “entry.280590041=“) and the name from the C column as the third argument (string3 = C2). The formula looks like this:
=CONCATENATE(D2, “entry.280590041=”, C2)
The end result is going to be the whole link from column D with the custom name, from column C, at the end of the link. This is my spreadsheet now:

Now, that we are satisfied with the end result, we can copy the formula in the next rows to generate the links for other users.
This is the final link, we can copy the link and send it to our users manually, share the spreadsheet with them, or you can create a script, from the tutorial I mentioned, to automatically send the links to the corresponding email address from the first column.
If you want to skip all these steps and just insert the formula, as promised, here it is:
=CONCATENATE(“https:// paste the whole link without the name at the end”, SUBSTITUTE(B2,” “,“+”))
Next, you can follow this article: Create a Script to Send Emails from Google Sheet to send emails with the pre-filled form link to the intended recipients.
Hope this helps you. If you have any questions just leave a comment.
