This solution will create a PDF file from a Google Form submission using a Google Doc as a template. You can also use a Google Spreadsheet or a Slide as a template with just a few simple modifications.
On your request, I have also created a how-to create a new Google Slide from a slide template and save it to PDF or send it in an email. You can find the post here: Google Form to Slides + Save to Drive and/or send it in email as a PDF
Generally, you have a plugin for this, but I suggest not to use one because you just need a simple script and without any knowledge in Google script you can implement it in few minutes.
So, for this to work you will need a Google Form and a Google Doc that will act as a template. If you already have a Form then create a Google Doc and add the text you want to convert to PDF, like a template. Then, mark the fields with curly brackets {the field} where you want the text from the Form to appear. Similar to the image below:
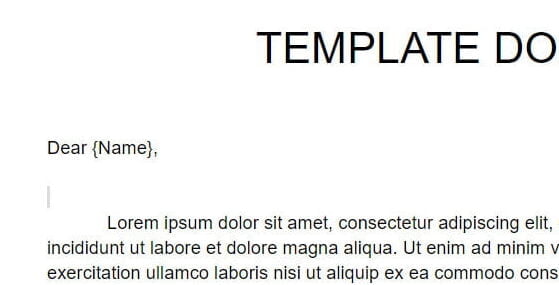
As you can see, I have added the text “Name” in curly brackets, so I can easily find and change it to whatever I need. You can add any other text from your template to be changed by the script. Here is an example, if you collect a phone number, you can add the following tag:
Dear Name,
Your mobile phone number is: number
Dear {Name},
Your mobile phone number is: {number}
The next step is to add the script in to your Form and just make a small modification to it to match your Form and Template.
Google Form
While editing your Google Form, go to the Form menu (the three-dot icon) and open the Script Editor.
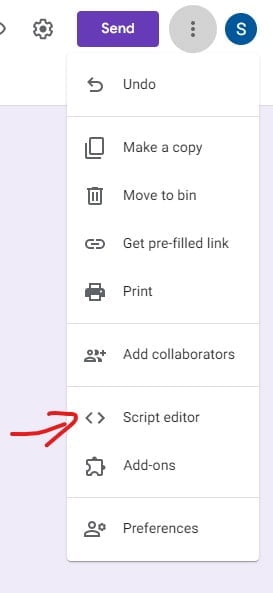
In the script editor paste the following script:
function onFormSubmit(e) {
  //open the template document by ID
  //you can find the ID in the link of the document
  var templateDoc = DriveApp.getFileById('12EZQW2k757k4ZVPy1VyH_y-Wgx4zPF7g7zUCl-PEsH0');
  //create a copy of the template, we don't wanna mess up the template doc
  var newTempFile = templateDoc.makeCopy();

  //open the new template document for editing
  var openDoc = DocumentApp.openById(newTempFile.getId());
  var body = openDoc.getBody();

  //get the responses triggered by On Form Submit
  var items = e.response.getItemResponses();

  //find the text in the template doc and replace it with the Form response
  //items[0].getResponse() is the first response in the Form
  //and it is the "Name"
  body.replaceText('{Name}', items[0].getResponse());
  //items[1].getResponse() is the second and it is the date
  body.replaceText('{date}', items[1].getResponse());

  //You can add as much as you have and change them in the Template Doc like this
  //body.replaceText('{number}', items[2].getResponse());
  //body.replaceText('{choice}', items[3].getResponse());
  //and so on...

  //Save and Close the open document
  openDoc.saveAndClose();

  var theBlob = newTempFile.getBlob().getAs('application/pdf');
  //The name of the file is going to be the first and second question from the form
  //change to your preference
  var nameFile = items[0].getResponse() + '-' + items[1].getResponse() + '.pdf';

  //send an email with the PDF
  //If you don't want to send the PDF in the mail just delete everything
  //from here -------
  var email = items[2].getResponse();
  var subject = 'Your new documnet';
  var body = 'Hello, <br/>Check this PDF file.';
  GmailApp.sendEmail(email, subject, body, {
    htmlBody: body,
    attachments: [{
      fileName: nameFile,
      content: theBlob.getBytes(),
      mimeType: "application/pdf"
      }]
   });
  //to here ------

  // save the PDF file in your Drive

  var savePDF = DriveApp.createFile (theBlob);

  //if you want to save the file in a specific folder use this code
  //get the ID from the folder link
  //var folder = DriveApp.getFolderById('14nUc----------0lUb');
  //var savePDF = folder.createFile (theBlob);

  savePDF.setName(nameFile);

  //delete the temp file
  DriveApp.getFileById(newTempFile.getId()).setTrashed(true);
}
What to change
First thing is to change the ID of the template document located on line 4. So, open your Google doc template and copy the ID from the link.

Now replace the Google doc ID with yours.
Next, the script changes the curly brackets fields with the Form submissions. The submission is stored in variable “items” in the exact same order like in the Form. So, the first question in the form is the item “0”, the second one is the item “1”, and so on. For the example, I have included two entries in the script that are replaced, the name and the date.
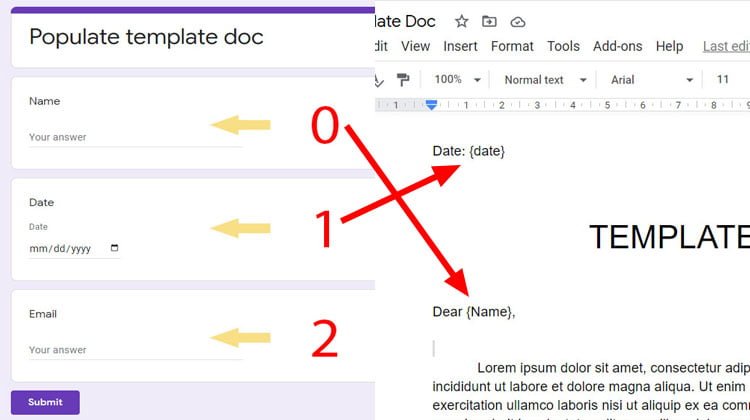
And the code that is used to replace the fields, is located on lines 18 and 20.
body.replaceText('{Name}', items[0].getResponse());

body.replaceText('{date}', items[1].getResponse());
As you can see from the code, it replaces the text “{Name}” with the item “0” (or items[0].getResponse()), which is the first entry in the Form. The second code replaces the text “{date}” with the second Form entry. Change the number in the code to fit your Form and template, and add more code like this if you have more fields.
The next thing you need to change is the name of the file on line 33. For me, the name of the file is the is going to be the first and the second question from the form. Change it to your preference.
If you don’t want to send emails, just delete the code from lines 38 to 48. But if you do, you need to set the email address in the script. In my form, the email address question is the third question in the Form, so I use the code on line 38 to get the email. Change the “Items” number to your preference.
That’s it, you are now good to go. But in case you want to save the PDF file in a different folder you need to change the last few lines of code. Like this, the script will save the PDF in the root folder.
So, to change the folder where the script saves the PDF, delete the code on line 53 and remove the comment character from the code on lines 57 and 58. Now all you have to do is to get the ID of the folder, from the folder link, and paste it in the code on line 57. It will look something like this:
// save the PDF file in your Drive

//if you want to save the file in a specific folder use this code
//get the ID from the folder link
var folder = DriveApp.getFolderById('14nUc----------0lUb');
var savePDF = folder.createFile (theBlob);
Review and accept permissions
Run the script and follow the on-screen instruction to review and accept the permission. If you have any problems, check this guide: Google Script Authorization: Review and Accept the Permission Guide.
The script will generate an error, but this is normal, it’s intended to run when you submit the Form.
Now, you can set the script trigger to start the script when you submit the Form
Set a Script Trigger
In order for the script to execute every time you fill in the form, you must set up a script trigger “on Form Submit”. To do that, click on the “Triggers” from the left-hand menu.
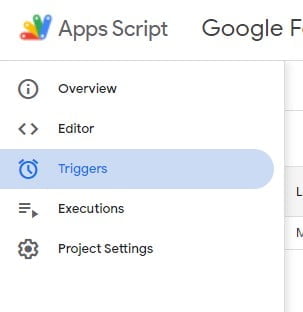
Now, click on “+ Add Trigger” button located in the bottom right corner.

In the next window select event type to be “On form submit” and click Save.
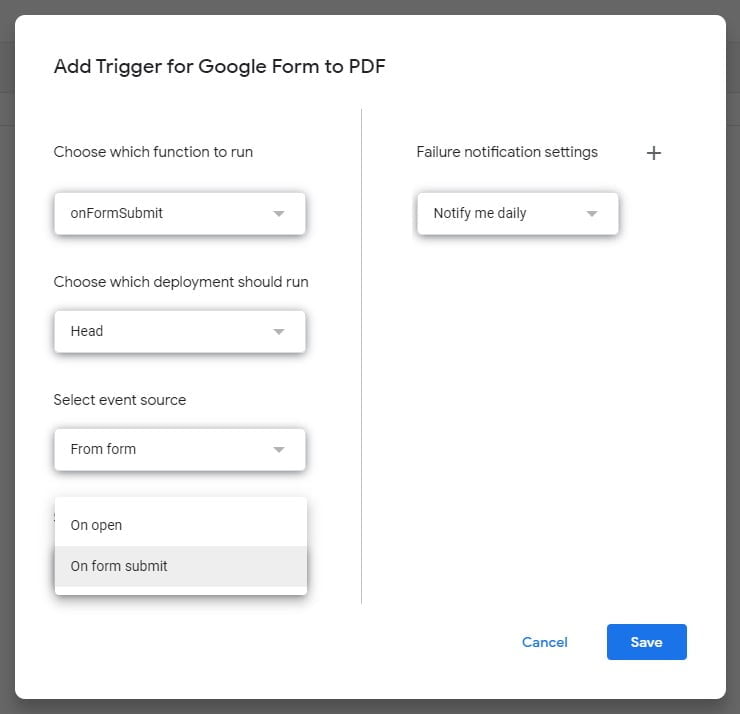
Sometimes it’s going to take you again through the process to review and accept permissions, so again follow the onscreen instructions.
That’s it, now every time you submit the form the script will create and/or email the PDF to you or whoever you set the email address to. If you have any problems just post in a comment and I’ll get back to you.
