
Introduction
Do you spend time copying information from Google Sheets into Google Docs? If you manage reports, invoices, class lists, or customer data, doing this manually can take hours.
With Google Apps Script, you can automate this process. In just one click, you can generate a properly formatted Google Doc directly from your Google Sheet.
In this guide, you’ll learn:
- How to prepare your Google Sheet for automation.
- How to add and run a script that generates Google Docs from your sheet.
- How to add a custom menu so you can run it anytime.
This method is simple and works for any sheet you have open.
Step 1: Prepare Your Google Sheet
- Open Google Sheets and create a new spreadsheet.
- Name the spreadsheet something meaningful (e.g., Reports Data).
- Add your data in rows and columns.
- Make sure the sheet you want to use is active (selected) when you run the script.

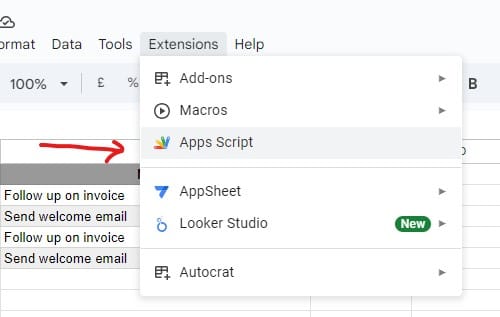
Step 2: Open the Apps Script Editor
- In your Google Sheet, go to Extensions > Apps Script.
- The Apps Script editor will open in a new tab.
- Delete any sample code from the editor.
Step 3: Paste the Script
Paste this code into the editor:
function generateDocumentFromActiveSheet() {
  const ui = SpreadsheetApp.getUi();

  // Ask for the document name
  const documentNamePrompt = ui.prompt("Enter the name for the new document:");

  // Get the active spreadsheet and sheet
  const spreadsheet = SpreadsheetApp.getActiveSpreadsheet();
  const activeSheet = spreadsheet.getActiveSheet();

  // Create a header from spreadsheet name and sheet name
  const reportHeader = `${spreadsheet.getName()} - ${activeSheet.getName()}`;

  // Get all data from the active sheet
  const data = activeSheet.getDataRange().getValues();
  if (data.length === 0) {
    ui.alert("No data found in the active sheet!");
    return;
  }

  // Get the folder where the spreadsheet is located
  const spreadsheetFile = DriveApp.getFileById(spreadsheet.getId());
  const parentFolder = spreadsheetFile.getParents().next();

  // Create the new Google Doc
  const newDoc = DocumentApp.create(documentNamePrompt.getResponseText());
  const newDocFile = DriveApp.getFileById(newDoc.getId());

  // Move the new document into the same folder as the spreadsheet
  newDocFile.moveTo(parentFolder);

  // Add header and table to the document
  const docBody = newDoc.getBody();
  docBody.insertParagraph(0, reportHeader)
         .setHeading(DocumentApp.ParagraphHeading.HEADING1);

  // Append the table with sheet data
  const table = docBody.appendTable(data);

  // Format the table header row
  const headerRow = table.getRow(0);
  const numberOfCells = headerRow.getNumCells();

  headerRow.editAsText()
           .setBold(true)
           .setForegroundColor('#ffffff');

  for (let i = 0; i < numberOfCells; i++) {
    headerRow.getCell(i).setBackgroundColor('#777777');
  }

  // Display the link to the created document
  ui.alert(`Document created successfully!\n\nOpen it here:\n${newDoc.getUrl()}`);
}

function addCustomMenu() {
  const ui = SpreadsheetApp.getUi();
  ui.createMenu('Document Tools')
    .addItem('Generate Google Doc', 'generateDocumentFromActiveSheet')
    .addToUi();
}

function onOpen() {
  addCustomMenu();
}
Step 4: What This Script Does
- Asks you for the document name.
- Uses the active sheet as the data source.
- Automatically creates a header from the spreadsheet name and sheet name.
- Generates a new Google Doc with a header and a table of your data.
- Saves the new Doc in the same folder as the spreadsheet.
Step 5: Run the Script for the First Time
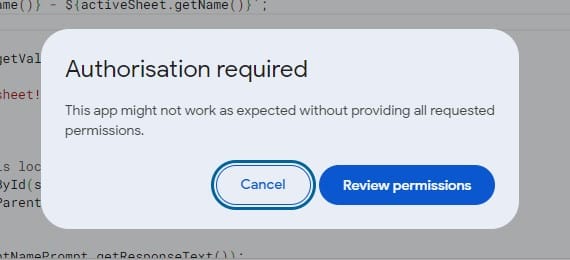
- In the Apps Script editor, select the “addCustomMenu” function from the dropdown and then click the Run ▶ button.
- Google will ask for permission the first time you run it:
- Click Review permissions.
- Choose your Google account.
- Click Allow.
- For detailed instructions on allowing permissions, see this guide: How to accept Google Script permissions
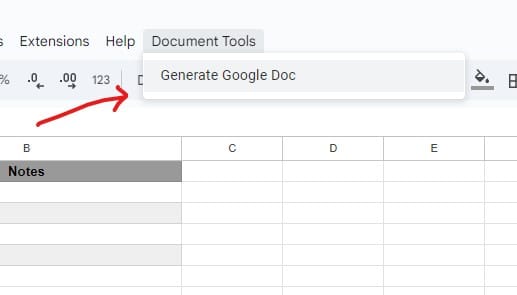
Step 6: Use the Custom Menu
After the script runs for the first time, your spreadsheet will now have a new menu at the top called Document Tools (if you don’t see the menu refresh the page with the spreadsheet).
- Click Document Tools > Generate Google Doc.
- Enter the document name when prompted.
- The script will generate the document and display its link in a pop-up.
Step 7: Access Your New Google Doc
- Copy the link displayed in the pop-up alert and paste it in a new tab to open the document immediately.
- The document is also saved in the same folder as your spreadsheet in Google Drive.
Why This Is Useful
- Fast and consistent: Generates documents instantly and keeps the same format.
- Organized: The document is saved with your spreadsheet so everything stays together.
- Flexible: Works on any sheet you have open, for any type of data.
Conclusion
Now you can turn any Google Sheet into a professional Google Doc in seconds. This tool is ideal for creating reports, invoices, class rosters, or any document that needs data from a sheet.
Open your sheet, run the script, and let it handle the work for you. The clickable link at the end makes it even easier to access the created document right away.