In the previous article, Add Auto Number to Google Form Response Sheet, we used a formula to automatically add numbers to Google Form responses in the sheet. The formula was easy to implement and you can also use text mixed with numbers. But the main problem with using this solution is that it always resets the numbering, so if you delete a response all the following responses will get new numbers.
After I receive a bunch of requests to find a solution to this problem I decided to create a script that will fix this problem.
This Google Sheets Script for auto numbering Google form responses is going to create a column in the ‘Form responses 1’ sheet and add the numbers automatically on every Form submission. Basically this script will accomplish the same thing as the formula, but it will keep the numbers if you decide to delete a response.
Bonus
Also, on your request, I have included a few lines of code to add to the script and be able to send back a response receipt with the AutoNumber as a reference number.
The Script for Auto numbering Google form responses
On the first run, this script will create a new column before the “Timestamp” column and insert numbers for the responses that are already there. And then, on every form submit it will check for the last number and increase it by 1. So yes, it will need a trigger to run.
Here is the script:
function addAutoNumber() {
  var sheet = SpreadsheetApp.getActive().getSheetByName("Form responses 1");
  // Get the last row that has content.
  var LastRow = sheet.getLastRow();
  // Set the first Auto Number
  var AutoNumberStart=100;

  //---- First run ------------

  //Check if the first column is Timestamp
  if (sheet.getRange(1, 1).getValue() == "Timestamp") {
    // insert a column to the left and the text "Auto Number" in the first row
    sheet.insertColumnBefore(1);
    sheet.getRange(1, 1).setValue("Auto Number");
    // Fix for (probably) a bug that formats the new column
    // with the same format of the column used to insert it,
    // in this case the column gets the date format like the Timestamp column.
    // So we set the format to number
    sheet.getRange("A2:A").setNumberFormat(0);
    // check if there are already form responses and add numbers for them
    if (LastRow>1) {
      for(var ii=2; ii <= LastRow; ii++) {
        sheet.getRange(ii, 1).setValue(AutoNumberStart);
        AutoNumberStart++;
      }
    }
  }

  // ---- Add new Auto Number ----------

  // Check if there is a Number in the AutoNumber column
  // for the last Form Submission
  if (sheet.getRange(LastRow, 1).isBlank()) {
  // Check if it is the first Form submission and set the AutoNumberStart
    if (LastRow == 2) {
      sheet.getRange(LastRow, 1).setValue(AutoNumberStart);
    } else {
      // Get the Last AutoNumber from the previous row
      var LastAutoNumber = sheet.getRange(LastRow-1, 1).getValue();
      // Set the next AutoNumber
      sheet.getRange(LastRow, 1).setValue(LastAutoNumber+1);
    }
  }
}
Note
This script uses just a number for autonumbering responses. If you want to include a text with the number I have included a few changes to the script, just check the “Use text with numbers for autonumbering” section.
How to implement
It is very easy to implement this script and set a script trigger, you have to just:
- Open the Google Sheet that you use to collect responses
- Open the Script Editor and paste the script
- Run the script and accept permissions
- Set script trigger “On form submit”
So let’s start, first you need to implement this script in your Google Sheet where you collect the responses from your Google Form. It does not matter if you already have responses collected in the sheet, the script on the first run will create the column for the auto numbers and populate the missing values. So, when you open your sheet it may look like these two examples:
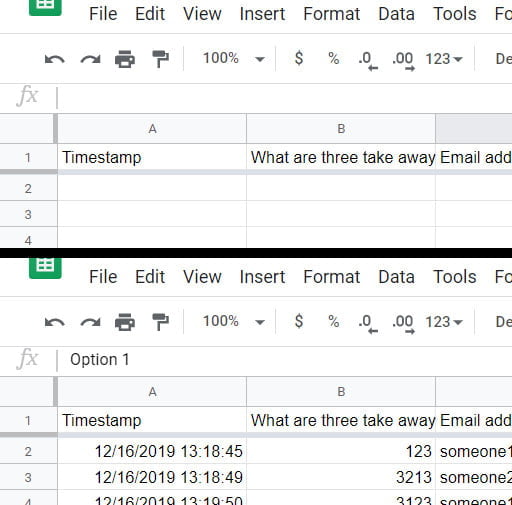
To insert the script you need to open the script editor from the sheet, so select “Script editor” from the “Tools” menu. The script editor will open in a new tab in your browser. Now, delete everything there and paste the script.
What to change
You don’t need to change anything, maybe just the starting number. But if you use a different language maybe you will need to change the name of the sheet that collects the responses (Form responses 1) and the name for the “Timestamp” column.
To change the starting number just edit the value on the line 6. My starting number is 100, you can change ti to whatever you like.
var AutoNumberStart=100;If the name of your sheet that collects the responses is different from “Form responses 1”, you must change that. So, locate the command on line 2 and change the name of the sheet.
var sheet = SpreadsheetApp.getActive().getSheetByName("Form responses 1");And, if the header of the first column (Timestamp) in your sheet is different, change it on line 11.
if (sheet.getRange(1, 1).getValue() == "Timestamp") {Also, if you like a different header for the auto numbering column then mine, change the text “Auto Number’ to your preference. You can find this command on line 14.
sheet.getRange(1, 1).setValue("Auto Number");Run the script and accept permissions
From the toolbar click on the run icon to run the script. Now, because the script needs to access and add data to your sheet, it needs you to review and accept the permissions. You will get this notification:
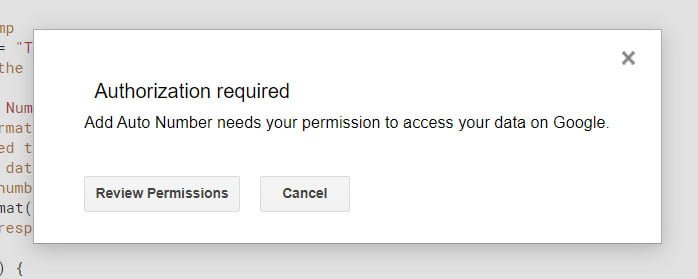
Click on the “Review Permissions” button and follow the on-screen instruction and accept the permission. If you get stuck, there is a detailed instruction in this article: Google Script Authorization: Review and Accept the Permission Guide, just follow the instructions there.
Now, you can check back the sheet to see that there is a new column for the auto numbers, and if you have responses all of them will have numbers.
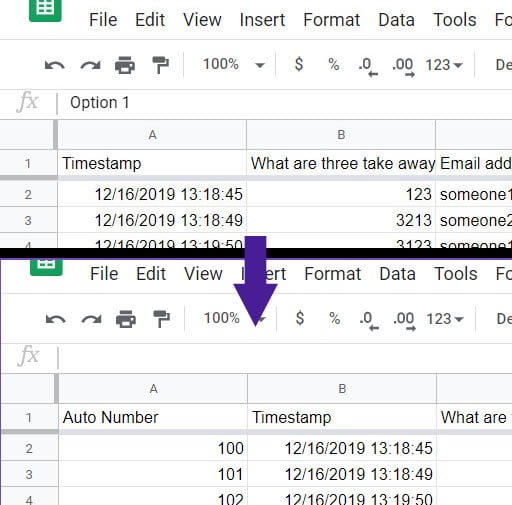
Add trigger on Form submit
In order to get auto numbers on every form submission, you have to trigger the script every time somebody fills in the form. To accomplish this you need to set a script trigger. Click on the “Current projects triggers” icon, from the tool bar and add a trigger.
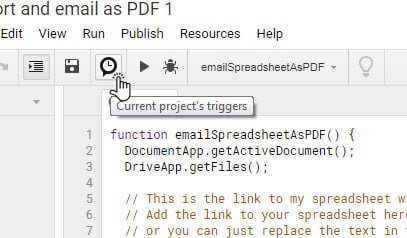
A new tab will open, where you can add a trigger for your script. Click on “Add trigger”, and add a trigger “On Form Submit” to run the script each time a Form is submitted. Check the image:
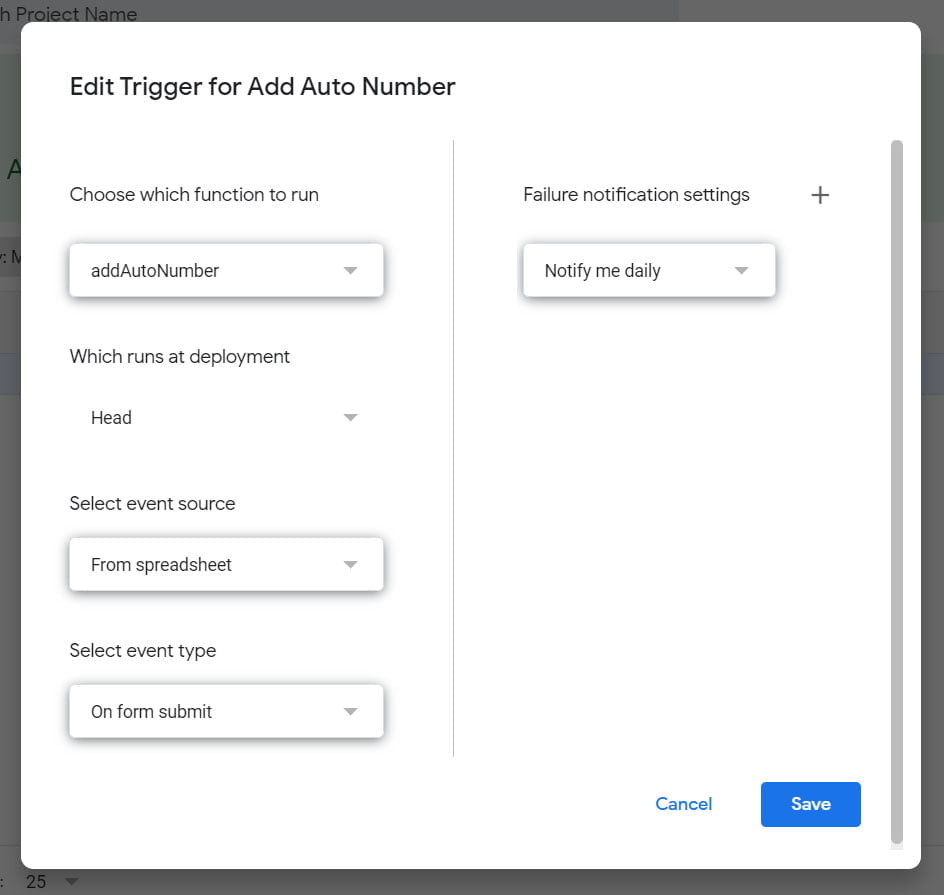
Click on Save, and again follow the on-screen instruction to review and accept the permission.
Now, everything is set and you can test your script by submitting a Form response. Check the sheet, and if everything is fine you will get a new number for the submission.
Send a response receipt with the AutoNumber as a reference number
In the comment section I had an interesting request:
Can Recipent see the Number code after submission, for future ref
Mayur
In response to the request, I decided to add these few extra lines of code that will enable you to send back a mail with the AutoNumber (reference number) to the responder. Just add this code in the previous script between lines 42 and 43.
    // ---- Send a response receipt with the AutoNumber as a reference number
    // Get the email from the column D (4-th column)
    // Change the number "4" to the number of the mail column in your sheet
    var EmailAddress = sheet.getRange(LastRow, 4).getValue();
    // Set the email subject
    var Subject = "Your Reference Number";
    //Create the message body
    // The "/n" in the message body means a new line
    var Message = 'Dear sir/madam, \nYour Reference Number is:' + (LastAutoNumber+1) + ' \nThank you!';
    // Send the mail
    MailApp.sendEmail(EmailAddress, Subject, Message);
Note
One of my visitors noticed that the script is not sending the response receipt for the first responder, so to fix that, also insert this code in the IF statement, between lines 36 and 37. Also, remove the “+1” in the var Message statement, it should be only “+ LastAutoNumber +”.
You just need to change the column number where you collect the mail from the responder. In my sheet, I have the email on column D which is the 4th column. Change the number in this line of code to fit your sheet:
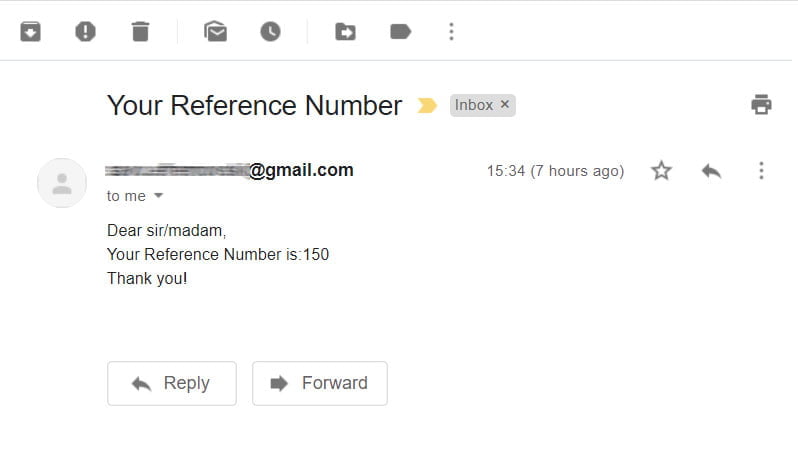
var EmailAddress = sheet.getRange(LastRow, 4).getValue();And here is a screenshot of the mail that the person who fills in the form will receive:
Use text with numbers for auto-numbering
Also, on your request, I have made a few changes to the script, and now you can use text with number to autonumber your form responses. For example, you can use “TEXT100” as your starting autonumber. Here are the changes you need to make to the original script, and also you can customize it to fit your requirements.
First thing to change is the AutoNumberStart variable, on line 6, with the text you want to start with. So, change the number 100 with “TEXT100”
var AutoNumberStart = "TEXT100";You can use different character in front of the number you must set them here. Next, delete the AutoNumberStart++; statement on line 24 and add this statement:
AutoNumberStart="TEXT"+ (parseInt(AutoNumberStart.match(/(\d+)/))+1);If you are using different characters in front of the number, you must specify them here. Change the part with the “TEXT” to whatever you are using in the AutoNumberStart variable. For example, if you are using “RFC100”, you must change the part “TEXT” with “RFC” in the statement. The rest of the statement extracts the number from the variable and increase them by 1.
The last thing to change is the statement on line 41:
sheet.getRange(LastRow, 1).setValue(LastAutoNumber + 1);Replace it with this statement:
sheet.getRange(LastRow, 1).setValue("TEXT"+ (parseInt(LastAutoNumber.match(/(\d+)/))+1));Same as in the previous statement, change the “TEXT” with your characters.
That’s it, run the scrip, if you are running it for the first time, accept permissions, and you will have your auto numbers with text in it:
TEXT100
TEXT101
TEXT102
....
If you are using the option to send a mail with the AutoNumber as a reference number you must change the statement that includes the auto number in the message. So, change this line:
var Message = 'Dear sir/madam, \nYour Reference Number is:' + (LastAutoNumber+1) + ' \nThank you!';To this:
var Message = 'Dear sir/madam, \nYour Reference Number is:' + ("TEXT"+ (parseInt(LastAutoNumber.match(/(\d+)/))+1)) + ' \nThank you!';That’s it. Hope it works for you and happy Autonumbering
