I know you have your Spreadsheet where you track your Stock/Inventory list and probably you have formulas there to do analysis on the data, and some pivot tables and charts. But you have to be on your computer to add or reduce the quantity or check the current status. This solution is very simple and you can use it on your mobile and check the Inventory on the go.
With this Inventory Management System, you can
- add items,
- add and reduce their quantity,
- add suppliers and customers,
- monitor the current status of the inventory and
- analyze sales by customers
You can also create your own analysis and charts, depending on what you need. My recommendation is to create a Google Site and insert the form and the charts and have everything in one place. I have created one, but I’ll paste the link after the next part.
How it works
To create this Inventory Management system you will need a Google Form and Spreadsheet to collect and analyze data and a Script to update the Form with the latest inventory status.
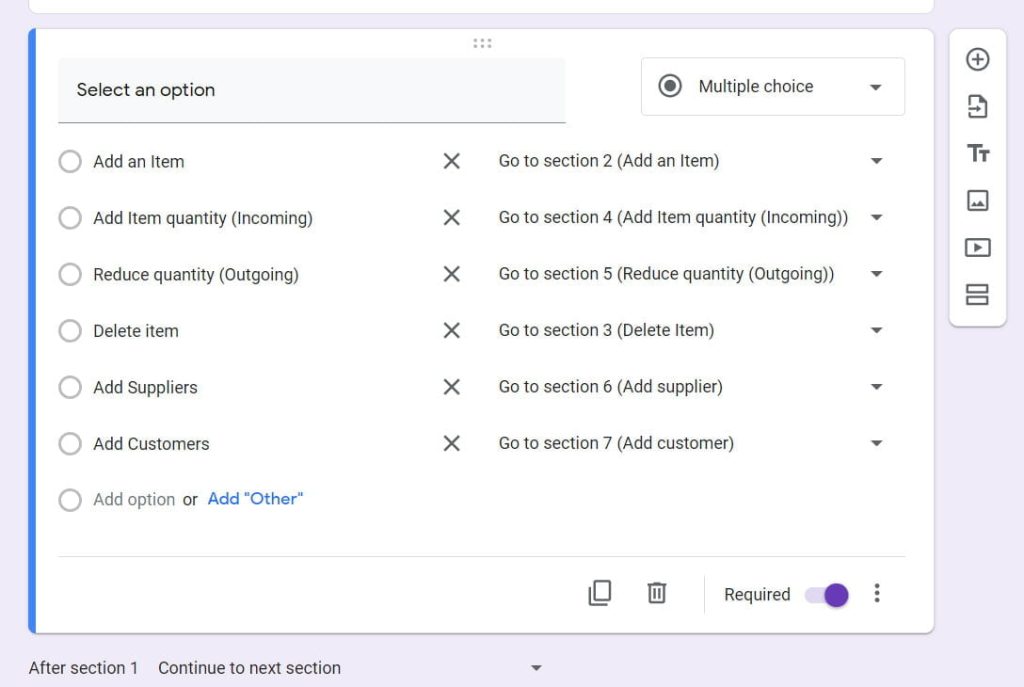
The Google Form is created in sections and every section does a different thing, like Add Item, Reduce Quantity, or Add Supplier. I use the first section on the Form as a switchboard, and based on the selection there I forward the Form to the right section. For example, if I select “Add an Item” it will go to the “Add an Item” section to add a new item in the inventory. Here is the image of the switchboard:
The responses from the Form are sent in a Google Sheet, where I analyze them based on the input type and filter out the responses. So, if the input is “Add Supplier” the supplier’s list is updated in the supplier’s sheet.
Next, I use a Google Script to update the Form with the latest data from the sheet. I use the script to Update Items, Update Items Status, Update Suppliers, and Update Customers.
For example, If I add a new supplier with the form, he must appear in the “Add an Item” section so you can add an Item from that supplier. So when I add a new supplier with the form, the script executes the function to update the “Select Supplier” in the “Add an Item” section with the new suppliers. In the next image, you will see a list of Suppliers that is updated from the script, so if you add a new supplier it will show up here.
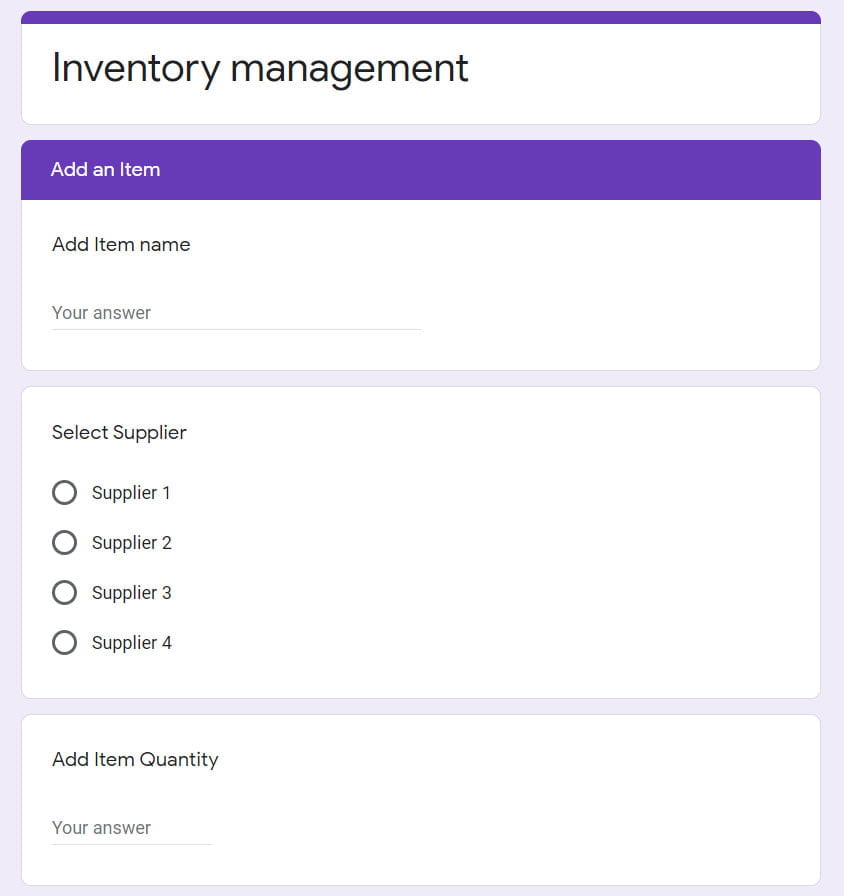
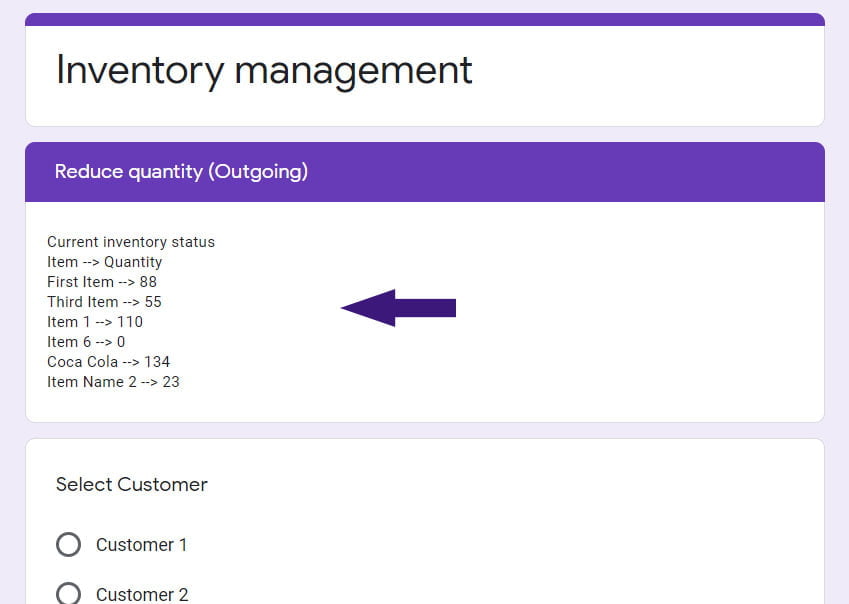
Similar to this, the script will update the list of items in the Add Item quantity (Incoming), Reduce quantity (Outgoing), and Delete data sections. Also, it will update the status of the current item in the Reduce quantity (Outgoing) section so you can see the quantity of the item you want to reduce, so you don’t go under the current quantity.
The best way to set up the whole solution is to create a Google site and use it from there. I have created a Google Site with the Inventory management system form, you can check it on the following address: https://sites.google.com/view/create-inventory-management/home. Also, on the site, you can check the current inventory status and Sales by customer.
How to implement
To implement this solution you will need to create a copy of my Form in your account, then to create a SpreadSheet to collect the answers from the form. In the sheet, you need to copy some of the formulas from my sheet in order to filter out Items, suppliers, and customers and calculate the current item status and sales. Then you can insert the script and set up the trigger onFormSubmit.
First, you need to make a copy of my Form by following this link: Inventory Management System Google Form, just press on the “Make a copy” button.
Inventory Management Form
The Form is divided into 7 sections. The first section is a switchboard, and by selecting to Add an Item, Add Suppliers or etc, it will forward you to the correct section. The next six sections are:
- Add an Item
- Add Item quantity (Incoming)
- Reduce quantity (Outgoing)
- Delete item
- Add Suppliers
- Add Customers
The Form works in that way, that after you select an item from the switchboard it will forward you to the selected section and you can submit the form. Here is how, for example, adding an item works:
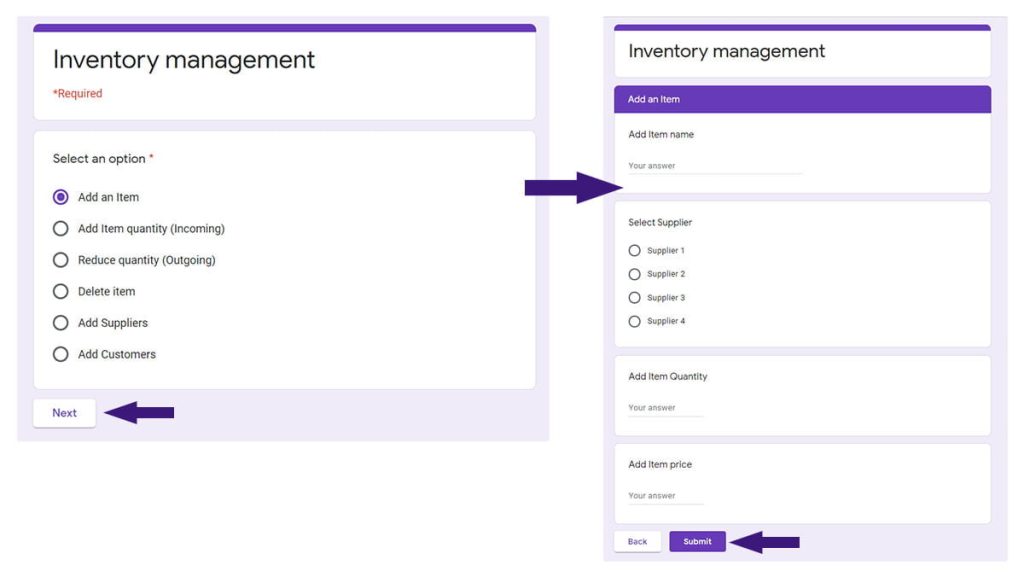
In your copy of the form, you will have some dummy data, like Supplier 1, Supplier 2…This is because my form was updated from the script with the data submitted previously. Don’t worry about this, as soon as you implement the whole solution the script will update the fields with your data. For example, in the previous image, in the Add an Item section, the Select Supplier question has 4 choices that are inserted from the script and as soon as you insert your own suppliers the script will update the list.
Note
If you change the name of the options (Add an Item, Add Item quantity (Incoming), Reduce quantity (Outgoing) …) in the multiple-choice question for the Switchboard, also you must change them in the script and in the formulas in the Spreadsheet or it won’t work. Just leave them for now.
Now, that you have a copy of the Form in your Drive, select to send the responses to a Spreadsheet. The Google Form will create a new Spreadsheet “Inventory management (Responses)” with the “Form responses 1” sheet that will collect the data.
Note
Before setting up the formulas in the Spreadsheet you must send in one form response. Google Forms inserts a new row every time they send the answers to Google spreadsheet and that can mess up your formulas if the sheet is empty.
So, open your form in entry mode, select “Add Suppliers” and click Next. In the Add supplier section enter data for the supplier and submit the form.
Inventory management (Responses) Spreadsheet
In order for this solution to work, you must filter out the Items in the Items sheet, also calculate the Quantity and get the list of Suppliers and Customers in their own sheets. So basically we need to create 4 more sheets to get this done.
Here is my sheet: Inventory management (Responses) Spreadsheet, you can get the formulas from there and also check how everything works.
First, we need to filter out the Items and also get the list of deleted Items to update the list. So, create a new sheet and name it “Items”. The correct name here is also important as we use it in the script, check this before you post a comment that you get a TypeError.
Items Sheet
For this sheet we need three columns: Item name, Delete Item and Item name.
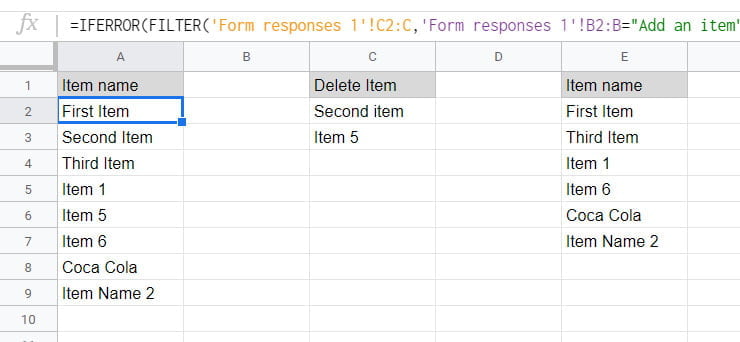
In the first column, we filter out the Items added from the form. You can get the formulas from the sheet I shared, but I’ll add them here too. Here is the formula to filter out items from the Form responses 1 sheet, add it in the A2 cell:
=IFERROR( FILTER( 'Form responses 1'!C2:C, 'Form responses 1'!B2:B = "Add an item"),"")
You don’t need to change the ranges in the formula, the locations of the data is going to be the same as mine since you copy the form from me. Add the formula to filter out Delete Items in the cell C2:
=IFERROR( FILTER ('Form responses 1'!G2:G, 'Form responses 1'!B2:B = "Delete item"), "")And now the formula to compare the two lists of Items and get the items that are not deleted. Add this formula in the last list “Item name” in the cell E2.
=IFERROR( FILTER( A2:A, len(A2:A), iserror( match( A2:A, C2:C, 0))), "")
I use the IFERROR function because the FILTER function will generate and error if there is nothing to display and we don’t want that.
Quantity Sheet
In this sheet, we use formulas to calculate the current quantity of the Items. First, add a new sheet “Quantity”. Then, we get the list of Items from the Items sheet, column E, and based on Item name we search through the “Form responses 1” sheet to get: Initial Quantity, Incoming, and Outgoing, and then we can calculate the current status.
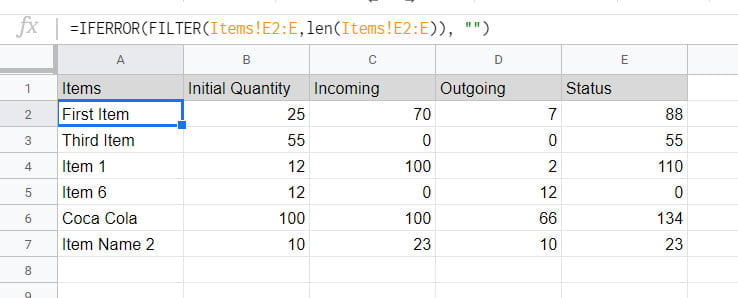
In the first column we use the FILTER formula to get the list from the Items sheet, insert the formula in cell A2:
=IFERROR( FILTER( Items!E2:E, len( Items!E2:E)), "")
In the next three columns we use the SUMIF and ARRAYFORMULA functions to calculate the Initial quantity (B2), Incoming (C2) and Outgoing (D2) quantity for the given Item:
=ARRAYFORMULA( IF( LEN(A$2:A), SUMIF( 'Form responses 1'!C$2:C, A$2:A, 'Form responses 1'!E$2:E), ""))
=ARRAYFORMULA( IF( LEN(A$2:A), SUMIF( 'Form responses 1'!H2:H, A$2:A, 'Form responses 1'!I2:I), ""))
=ARRAYFORMULA( IF( LEN(A$2:A), SUMIF( 'Form responses 1'!K2:K, A$2:A, 'Form responses 1'!L2:L), ""))
And finally we get the current quantity status (E2) for the Items using this formula:
=ARRAYFORMULA( IF( LEN(A2:A), B2:B+C2:C-D2:D, ""))
Suppliers and Customers sheet
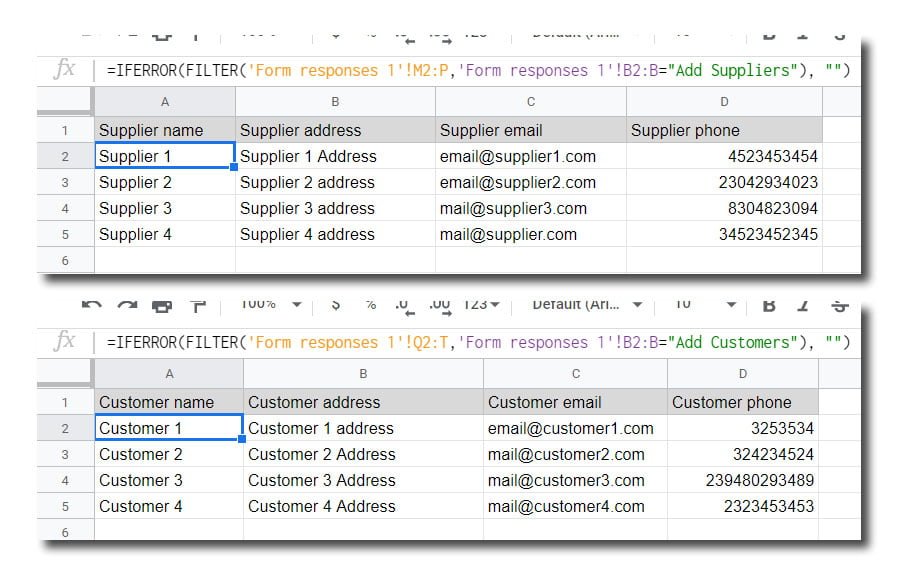
In these two sheets, we filter out the Customers and Suppliers with simple FILTER function. So, add a “Suppliers” sheet and use this formula (cell A2) to filter out Suppliers from the Form responses 1 sheet:
=IFERROR( FILTER( 'Form responses 1'!M2:P, 'Form responses 1'!B2:B = "Add Suppliers"), "")
Also, do the same for the Customers sheet, add a new sheet “Customers” and add the formula in the cell A2:
=IFERROR( FILTER( 'Form responses 1'!Q2:T, 'Form responses 1'!B2:B = "Add Customers"), "")
Note
If you want to change the names of the sheets, make sure that you change them in the script too, or it won’t work.
You don’t need the next two sheets now for the solution to work, I just use them to show how you can make an analysis of the data. You can make them after you have some data to analyze.
Sales and Sales Pivot Table Sheets
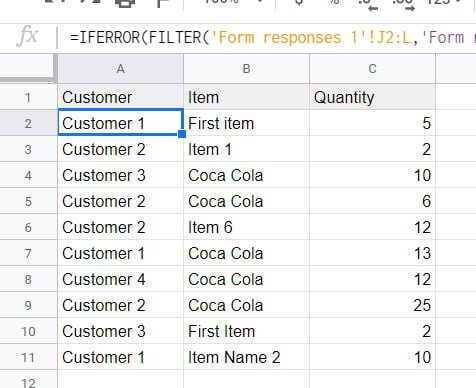
To get all the sales (reduction of inventory) I filter out all the responses from ‘Form responses 1’ sheet that has “Reduce quantity (Outgoing)” selected from the switchboard. Use this formula in A2 cell.
=IFERROR( FILTER( 'Form responses 1'!J2:L, 'Form responses 1'!B2:B = "Reduce quantity (Outgoing)"), "")
After you have all the sales filter out in the Sales sheet, create a pivot table.
From the Data menu select Pivot Table and create one in a new sheet. For the range use Sales!A:C, for Rows use Customer column, for Columns use Items and for Values use Quantity column. I’ll create a separate how to create a Pivot Table and post the link here.

Inventory Management Script
The basic function of this script is to update the Google Form. So, this script will trigger on form submit and update the form based on the data received from it. Here is what the script does:
- If you add a new Item using the form, the script will update the sections: Delete Item, Add Item quantity (Incoming), and Reduce quantity (Outgoing), and add the new Item in the Select Item multiple choice question.
- If you add a new Supplier, it will update the Add Item section and add the new Supplier in the Select Supplier multiple-choice question.
- If you add a new Customer, it will update the Reduce quantity (Outgoing) section and add the new Customer in the Select Customer multiple-choice question.
- Also, on any change of the quantity, the script will update the Reduce quantity (Outgoing) section and change the Helper text with the list of Item’s current quantity. Just an easy way to check the Item quantity before reducing it.
Note
You need to insert this script into the Spreadsheet because we need to update the Form with the new data that we filter in the sheets.
So, open the Script Editor in the spreadsheet and copy/paste the following script:
function onFormSubmit(e) {
  // This function catches the form response in variable "e"

  // Open the Form. Change the ID to the ID of your form
  var form = FormApp.openById("13oYiWBHJAs1rKS-NM4ho6W20yHokoP5XdNttd0w5kqQ");
  // Get the active Spreadsheet
  var ss = SpreadsheetApp.getActive();
  // Check the input from the Switchboard
  switch (e.namedValues['Select an option'][0]){
    case "Add an Item":
      updateItems(form,ss);
      updateItemStatus(form,ss);
      break;
    case "Delete item":
      updateItems(form,ss);
      updateItemStatus(form,ss);
      break;
    case "Add Item quantity (Incoming)":
      updateItemStatus(form,ss);
      break;
    case "Reduce quantity (Outgoing)":
      updateItemStatus(form,ss);
      break;
    case "Add Suppliers":
      updateSupplier(form,ss);
      break;
    case "Add Customers":
      updateCustomers(form,ss);
      break;
  }
}

function updateItems(form,ss) {
  // Get the Form question by ID
  // Multiple choice Question "Select Item (add)" from the "Add Item quantity (Incoming)" section
  var AddItemsList = form.getItemById("1479705159").asMultipleChoiceItem();
  // Multiple choice Question "Select Item (reduce)" from the "Reduce quantity (Outgoing)" section
  var ReduceItemsList = form.getItemById("1324675744").asMultipleChoiceItem();
  // Multiple choice Question "Delete Item" from the "Delete Item" section
  var DeleteItemsList = form.getItemById("1172121379").asMultipleChoiceItem();

  // Get the sheet where the Item data is
  var items = ss.getSheetByName("Items");

  // Get the Item names from the fifth column in the sheet - use 2 to avoid the header row
  var itemsValues = items.getRange(2, 5, items.getLastRow()).getValues();

  var ListItems = [];

  // Transfer the items names (itemsValues) data and ignore empty cells
  for(var i = 0; i < itemsValues.length; i++)
    if(itemsValues[i][0] != "")
      ListItems[i] = itemsValues[i][0];

  // Update the Multiple choice questions with the Item names (ListItems)
  AddItemsList.setChoiceValues(ListItems);
  ReduceItemsList.setChoiceValues(ListItems);
  DeleteItemsList.setChoiceValues(ListItems);
}

function updateSupplier(form,ss) {
  // The procedure is the same as in the previous function (updateItems)
  // Multiple choice Question "Select Supplier" from the "Add an Item" section
  var Supplier = form.getItemById("1694536545").asMultipleChoiceItem();

  var items = ss.getSheetByName("Suppliers");

  var itemsValues = items.getRange(2, 1, items.getLastRow()).getValues();

  var ListItems = [];


  for(var i = 0; i < itemsValues.length; i++)
    if(itemsValues[i][0] != "")
      ListItems[i] = itemsValues[i][0];


  Supplier.setChoiceValues(ListItems);
}

function updateCustomers(form,ss) {
  // Multiple choice Question "Select Customer" from the "Reduce quantity (Outgoing)" section
  var Customer = form.getItemById("16928799").asMultipleChoiceItem();

  var items = ss.getSheetByName("Customers");

  var itemsValues = items.getRange(2, 1, items.getLastRow()).getValues();

  var ListItems = [];


  for(var i = 0; i < itemsValues.length; i++)
    if(itemsValues[i][0] != "")
      ListItems[i] = itemsValues[i][0];


  Customer.setChoiceValues(ListItems);
}

function updateItemStatus(form,ss) {
  // Littlebit different approach to insert the Current Inventory status
  var QuantitySheet = ss.getSheetByName("Quantity");

  var itemsValues = QuantitySheet.getRange(2, 1, QuantitySheet.getLastRow(), 5).getValues();
  // First line of text
  var ListItems = "Current inventory status\nItem --> Quantity\n";
  // populate the next lines of text with the Item Name and quantity
  for(var i = 0; i < itemsValues.length; i++)
    if(itemsValues[i][0] != "")
      ListItems = ListItems + itemsValues[i][0] + " --> " + itemsValues[i][4] + "\n" ;

  // Insert the List in the Section "Reduce quantity (Outgoing)" Help Text
  // The Description part of the section header
  form.getItemById("698478119").setHelpText(ListItems);
}
What to change
If you didn’t change the names of the multiple-choice options in the switchboard in the Google Form, and the name of the sheets, you only need to change the Google Form ID. Yeh, only that, I thought that you will need to change the Questions IDs too, but it turns out that when you copy the form they remain the same. The good thing is that they are a little bit difficult to locate.
So, you can get the Google Form ID from the link of the Form, it is the part of the link between “https://docs.google.com/forms/d/” and “/edit”. Change the Form ID on line 5 with your Form ID.
This script catches the form response in variable “e” in the first function onFormSubmit(e), so you cannot run this script from the script editor, you must setup a trigger “onFormSubmit”.
Add a trigger
The last step to get the things running is to set up a script trigger “On Form Submit” that will run the script every time a form is submitted. So, click on the “Current project’s triggers” button from the toolbar and add a trigger.
A new tab will open, where you can add a trigger for your script. Click on “Add trigger”, and add a trigger “On Form Submit” to run the script each time a Form is submitted. Make sure that the function “onFormSubmit” is selected. Click on Save, and follow the on-screen instruction to review and accept the permission. If you have any problems with accepting the permissions, check this guide: Google Script Authorization: Review and Accept the Permission Guide.
Now, everything is set and you can test your Inventory Management System, but first follow the instruction for the first run
First Run
Before you can add items to your inventory, you must add a Supplier. I know you have added one before implementing the formulas in the sheet, but the script didn’t process that input so you have to add another supplier. If you have only one supplier just reenter the data, submit the form, and then go back to the ‘Form responses 1’ sheet and delete one of the duplicated entries.
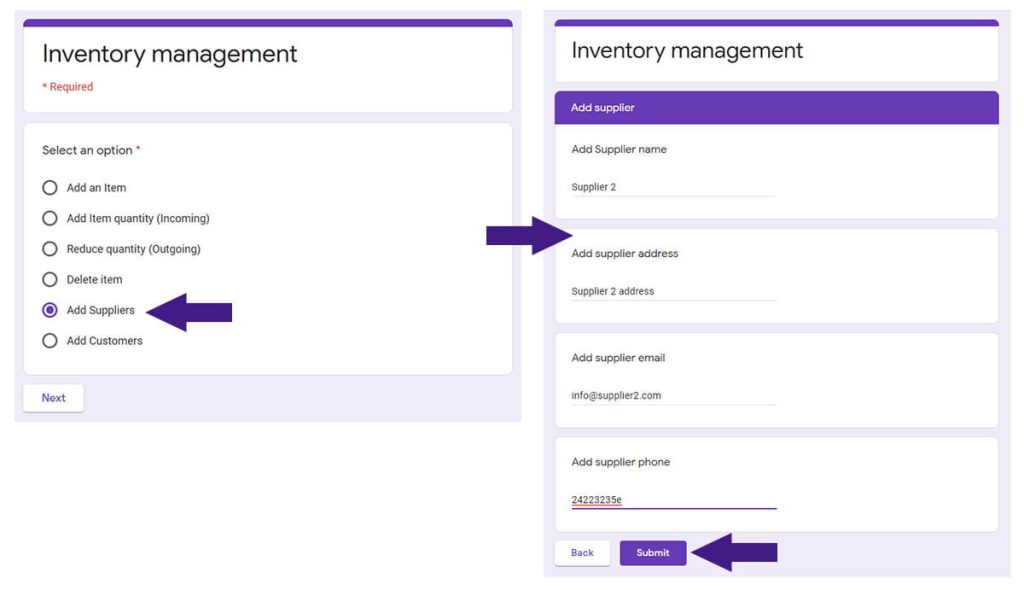
In the first response I added the “Supplier 1” and in this response, I added “Supplier 2”, so if the script executes without problem it will add the two suppliers in the “Add an Item” section. So, to check this, click on the “Submit another response”, select the “Add an Item” option, and click Next. Now you should see the two suppliers in the “Select Supplier” question. Here is how it looks in my form:
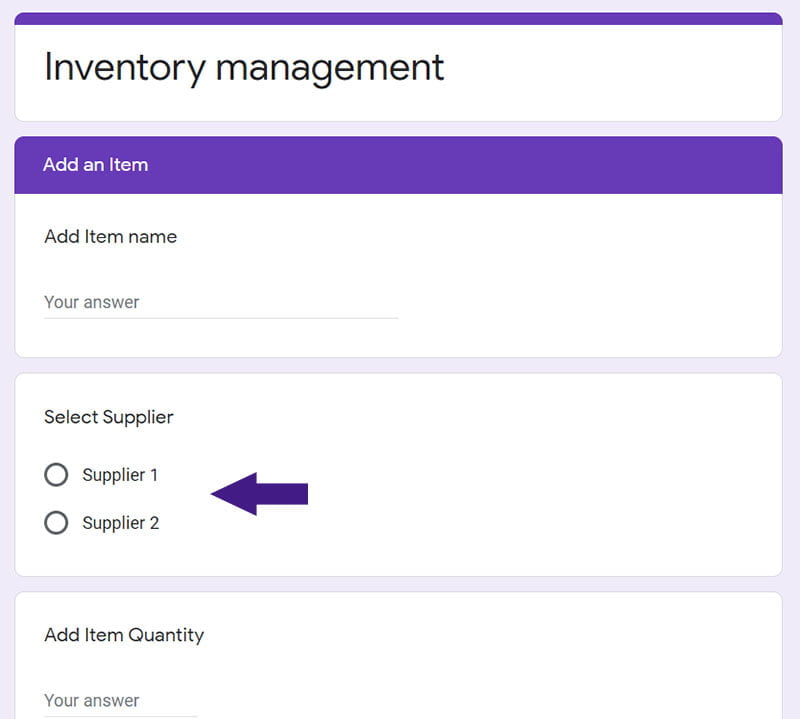
Now you can add an item and their initial quantity and price.
Also, before you can reduce the quantity of an Item in the Inventory you must add a Customer. So, the next logical step is to add a customer. After this, you can add Items, add more quantity to the items, reduce the quantity by the customer, and add more Suppliers and Customers.
Problems with script
If your form didn’t update with new entries for the supplier and/or items, and everything looks fine in the sheet there is a big chance that your script has problems running. Maybe is some misspelled name or something else. So, to see where is the problem you must open the Google Apps Script application and select the “My Executions” from the menu. Here you can see the list of all the executions of the script and their status. Locate the entry with the Failed status and check the error. Check the following image for reference:
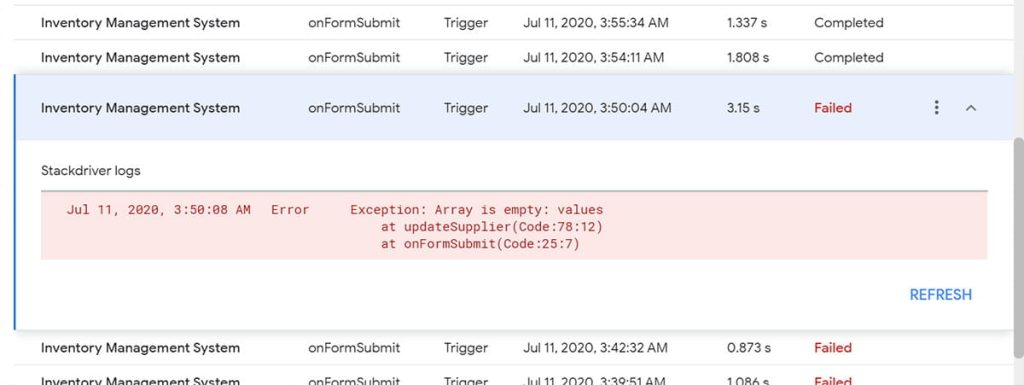
If you don’t manage to fix the problem send a comment with the error and we will try to help you.
