Google Docs doesn’t have the Print Merge or a Mail Merge option available, so if you want to create multiple documents from the data you have in your spreadsheet you have to use an Add-on. Usualy these add-ons have limited options and are missing some of the needed functions. I have been using this Google spreadsheet script to do a Print merge for a while and I have made small adjustments so it can be used by everybody.
Basically, this is a Google Spreadsheet with a Script that you can paste your data in it and do a Print Merge or a Mail merge with a Google doc template, you just have to match the column names in the spreadsheet with the text in the Google Doc.
With this Google Spreadsheet for Print merge or Mail merge for Google docs you can:
- Specify a folder where you want the files to be created
- Print merge to a PDF or Google Doc
- Send emails with the merged documents
- Specify the column with the email address
- Add a custom email Subject and Text
- If you select Google doc for a Mail merge, the attachment is converted and sent in Microsoft Word document format
*if you need extra options just send a request in the comments
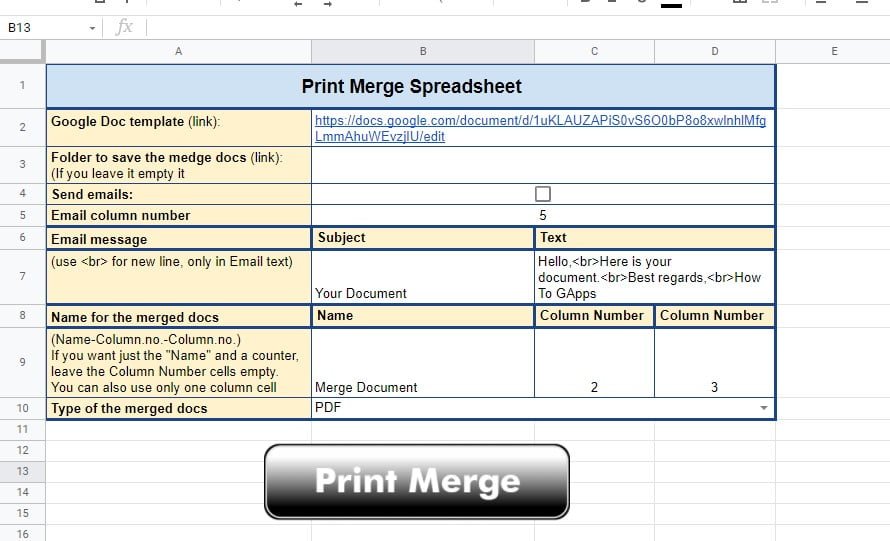
How to use it
It’s very easy. The short instruction would be:
- Add column titles and add or paste your data in the “Print Merge Data” sheet
- Create a Google Doc (template) and add the Column Title in double curly brackets (like this {{Column Title}}) where you want the data from the sheet to appear
- For example, if the Column Title is “Name”, add a text field {{Name}} in the Google doc template (like: Hello {{Name}}, how are you)
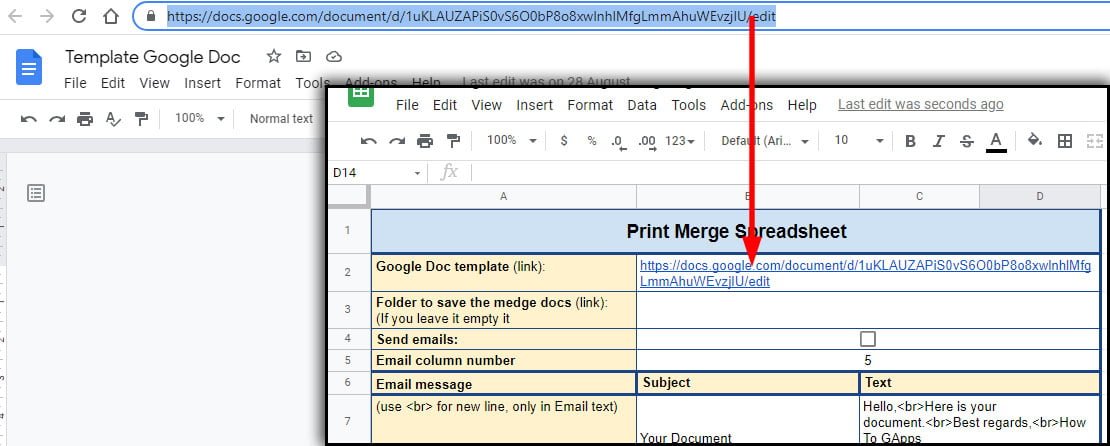
- Copy and paste the Google doc link in the “Google Doc template (link):” field in the “PrintMerge” sheet
- Copy and paste the Google folder link if you want the document saved in a different folder, if not leave it empty
- To send emails with the merged documents select the check box and on the next row (Email column number) specify the column with the email address.
- If you are sending emails, on the next row add the Subject and the text for the email message
- Next, you can define the name of the merge documents, if you leave it empty it will use the name of the template file with a counter on the end (1, 2, 3, …). You can also use data from the columns to construct the name of the document
- The last option lets you select the type of output document. You can select PDF or Google Doc
- Next, press the Print Merge button and that’s it.
- If this is the first time you are running the script you have to accept the permissions. Sometimes it will display an error, just dismiss it and run the script again
To get your copy of the spreadsheet just click on the following link:
Get the Print Merge Spreadsheet
Detail instructions
First, you need to get the spreadsheet in your Drive. The previous link will open a new tab in your browser and it will give you an option to Make a Copy of the spreadsheet. Click on the “Make a Copy” button and a copy of the spreadsheet will be created in your Drive.
The spreadsheet contains 2 sheets, in the first sheet “Print Merge Data” you can add the data that you want to use in the merge process. The second sheet “PrintMerge” contains the options and the Print Merge button to run the Script and do a Print Merge or a Mail Merge.
The Data for the Print merge
The column title is the most important here. You will use these column titles in your Google document to mark the field where you want the merged data to appear. So, paste your data here and make sure you have the first row with column titles.

Now that you have your data ready, create a
Google Document to use as a template
Create a new Google document, or use already made one, and add the column title in double curly brackets where you want the data from the sheet to appear. For example, if I want to use the data from the Name column I will add the text {{Name}} in the Document
Here is how my Google doc template looks like:
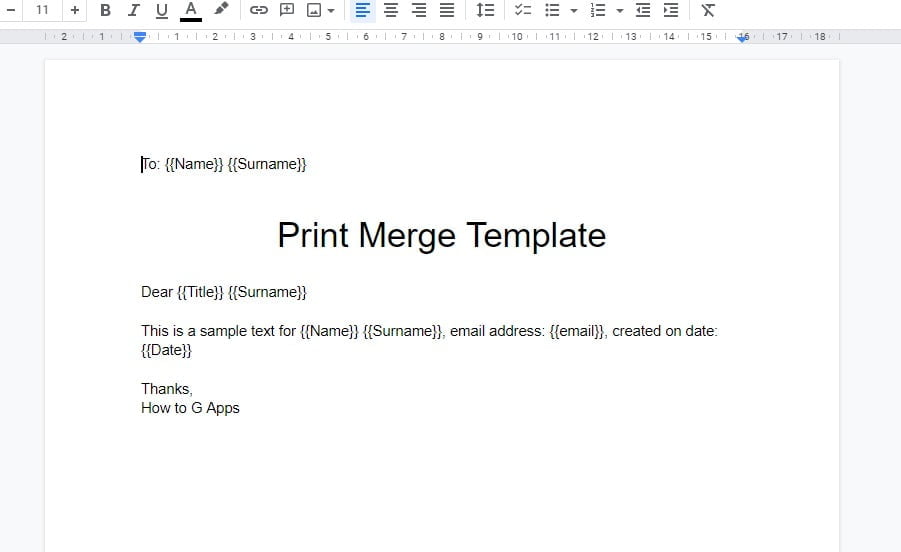
Next, you need to copy the link of the Google doc and paste it into the spreadsheet
Google Drive folder for the merged documents
If you want to use a different folder for your merged document you can paste the folder link in the sheet. To get the folder link just navigate to the folder you want and copy the link from the link bar. Here is an example:
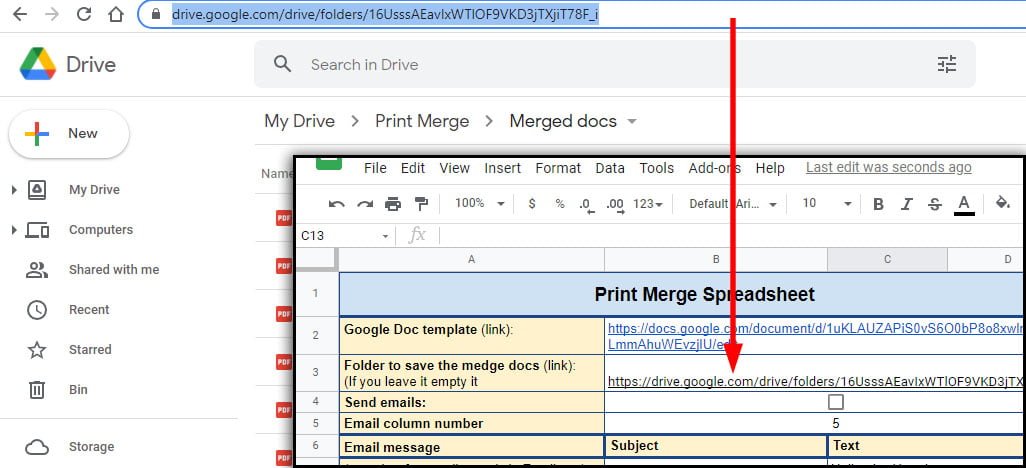
Next, you just need to select the options you want and you can start your Print or Email Merge
Print Merge Options
If you have an email address in your data you can also send an email to that address with the merged document. To do that, select the thick box, and in the next field specify the column number with the email address. In my case, the 5th column, column E, has the email addresses.

If you are sending emails, in the next field specify the Subject and the text for the email. The text can have HTML formatting, so you can use <br> for a new line and other HTML markups.

You can use the next option to construct a unique name for the merged documents. If you live the cells empty the script will use the name of the Google Doc and add an incrementing number at the end. So, if your Google doc name is “The Document” the name of the merged documents will be: “The Document1”, “The Document2”, “The Document3”, …
If you want a custom name you can use the Name and the Column numbers boxes to create one. For example, if you want the documents to have just a name like “The Merged Documents”, just add that in the Name box. The script will only add an incrementing number at the end.

If you want your documents to have names from the data, you can specify the column number to be used for that. For example, to name the document with the Name column (column number 2) from the sheet, like “Document-Ariella”, “Document-Mert”, and so on, add that column number in the text box like this:

You can also add a second column number if you want to include an extra field in the name. For example, if you want also to include the Surname in the name of the document, just add column number 3 in the last text box. Now the documents will be named: “Document-Ariella-Kramer”, “Document-Mert-Power”, and so on.
The last option is to select in what format do you want the merged documents to be created. You can select PDF or Google Doc.
Note: When using the option to send emails, if the type of the merged document is Google Doc, the script will convert and send the documents in Microsoft Word format.
Next, just click on the “Print Merge” button and you are done.
If you are running the script for the first time, the Google Spreadsheet will ask you to accept the permissions. Sometimes it will display an error, just dismiss it and run the script again (Print Merge button)
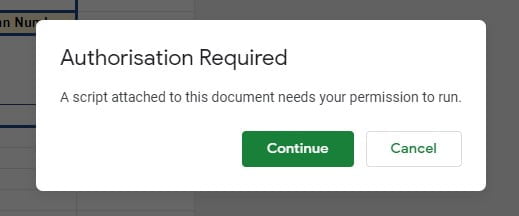
To accept the permissions just click on the “Continue” button and follow the on-screen instructions. If you have any problems check this article: Google Script Authorization: Review and Accept the Permission Guide
If you have any problems just post in a comment and I’ll get back to you.
