To access the Google Forms settings menu, you have to click the gear icon on the top right corner of your form. From here you can access a set of options you can perform on your Form. From restricting on who has access to the form to make your form act as a quiz test.
In this article, we are going to explain all of the settings available from the settings menu.
Google Forms Settings – General Tab
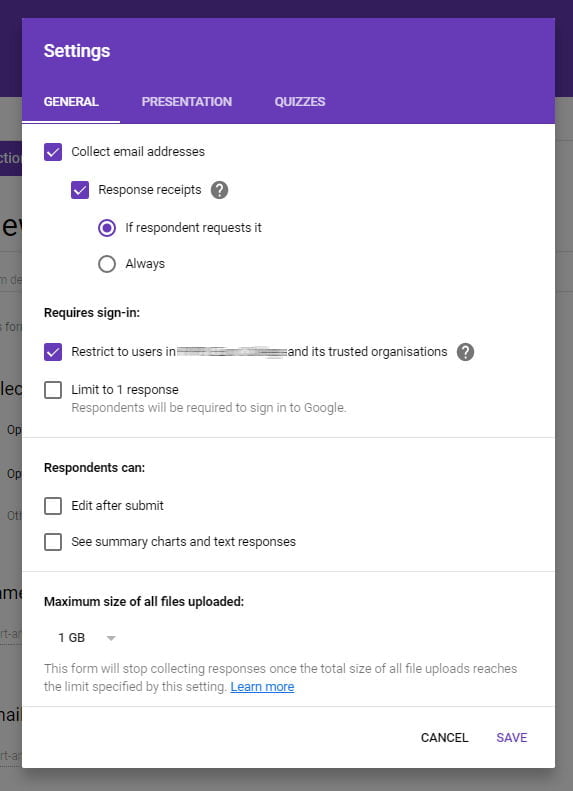
This is the first tab in the settings window and from here you can set the general options.

The first option is for:
Collect email addresses
If you have this option enabled, a question is going to appear at the beginning of your form asking the responders to enter their email address. Also, you can include a “Response receipt” when the user sends the form, and you can select to do this “Always” or “If respondent requests it”. If you have the “If respondent requests it” option enabled, the responder is going to have an option to select this at the end of the form.

Next is the option for:
Requires sign-in
This section is called “require sign-in” just because the user needs to sign-in in order for these settings to work. So, if you have some of the options here selected, Google Form is going to require the responder to sing-in in their Google or G Suit account.
Linit to 1 response will limit the responder to enter just one response.
If your account is a part of a G Suit, you will have two options here. The second option is “Restrict to users in “company” and it’s trusted organizations”. So, in order to fill in the form, you will have to have a “company” account. Whit this option selected, Google Form is going to collect the email address automatically and it won’t ask the responders to enter one, even if you have the “Collect email address” enabled.
Respondents can
Here you have the option “Edit after submit”, which will enable the responders to edit their answer. They can edit their responses after submitting the form, by clicking on the link “Edit your response” or they can do it later on by clicking on the “Edit Response” button on their email receipt. For this option to work you need to enable the “Response receipt” option from the “Collect email addresses” section.
If you select the option “See summary charts and text responses”, the responders can see the answers from all responders. The responses are going to be presented as a summary, so the responders can’t see the individual submissions.
If this option is enabled, after submitting the form, the responders can click on the link “See previous responses” and a new tab is going to open with a summary from all the responses.
At the end of the General tab, in Google Forms settings there is an option for:
Maximum size of all files uploaded:
This option is only available if you have the File Upload Question. From here you can set the size limit for all the files uploaded before the form stops accepting answers automatically.
Google Forms Settings – Presentation Tab
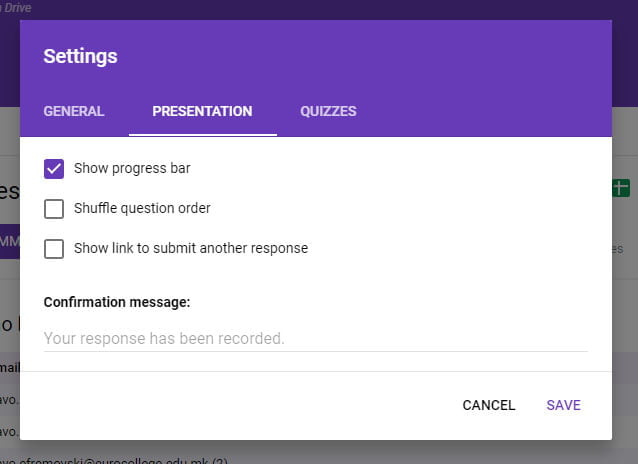
In this tab, you can set options on how the form is going to be presented to the responders.

You can “Show progress bar”, that will have an effect if you have more sections in your form. The progress bar is going to look like this:

The next option “Shuffle question order” will change the order of the questions and the “Show link to submit another response” to have a link to submit another response after the responder has submitted the form.
In the end, we have an option to set a custom message that will appear after the successful submission of the form. Just type in your message in the “Confirmation message:” field.
Google Forms Settings – QuizzesTab
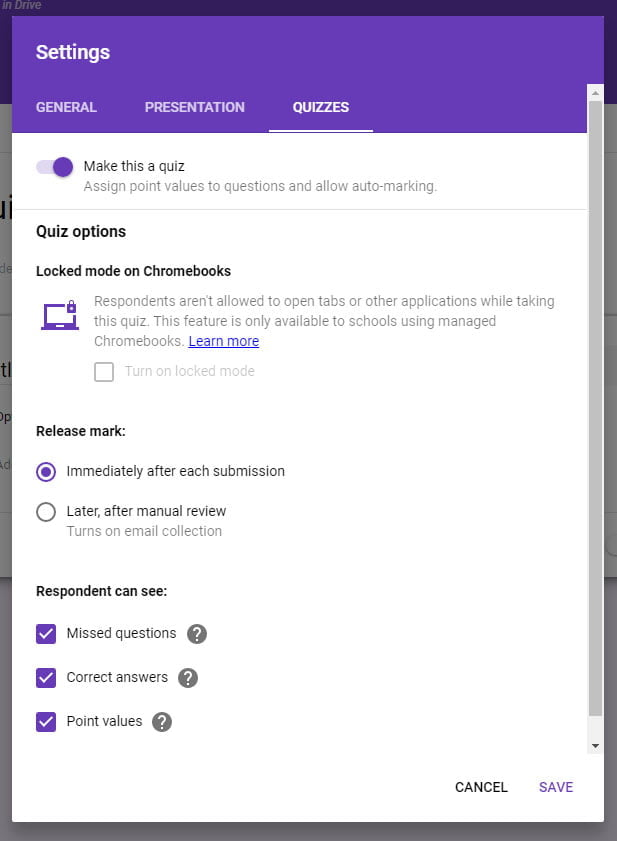
From this tab, you can set your Form to act as Quiz.

If the “Make this a quiz” option is selected, the form is set in quiz mode and all the other options in the tab can be adjusted. The first option is “Locked mode on Chromebooks” which will disable the responders to browse the internet and access other apps. This option is only available to G Suit users if they have Chromebooks registered on their domain.
The next setting is:
Release mark:
Here, you can select to release the marks “Immediately after each submission” to enable the option for the responders to check their marks right after the submission. If this option is enabled, responders will see a “VIEW SCORE” button.
If you select the “Later, after manual review” option, the score will be sent manually after the review from the creator. This option will automatically turn on the email collection.
In the last setting the
Respondent can see:
On this part you can set options about what will the responders see after they submit the form. Here you can set options like:
- “Missed questions” – Identify which questions have been answered incorrectly
- “Correct answers” – Shows the correct answer for each question after grades are released
- “Point values” – Show total points and points received for each question
